LAB 04 - Intro to Python and Colab
Learn Python to convert your ideas into working code and build tools to collect and analyze data.
Note that for this lab, your group will be turning in python notebook files (.ipynb) files instead of a lab report pdf.
Google Colab
What is Google Colab?
Google Colab (short for Colaboratory) is a free, cloud-based platform that lets you write and run Python code directly in your web browser. Think of it as Google Docs, but for programming!
Why Use Google Colab?
Advantages:
- ✅ No installation needed - Python comes pre-installed
- ✅ “Free” access - Just need a Google account (Google, so you pay for it in other ways, really)
- ✅ Works on any device - Runs on Chromebooks, tablets, phones
- ✅ Auto-saves - Your work is saved to Google Drive automatically, no need to worry about losing your work!
- ✅ Easy sharing - Share your code like a Google Doc
- ✅ Free GPU/TPU - Access to powerful computing resources (advanced)
Works well for:
- Beginners learning Python
- Quick experiments and prototypes
- Data analysis and visualization
- Machine learning projects
Getting Started with Google Colab
Each person in your group should completes these initial steps below
Step 1: Access Google Colab
Sign in with your Google account
You’ll see a welcome page with options to create or open notebooks
Step 2: Create Your First Notebook
Click “New notebook” or go to File → New notebook
You’ll see an empty notebook with:
- Code cells - Where you write Python code
- Text cells - Where you write notes (using Markdown)
Step 3: Understanding the Interface
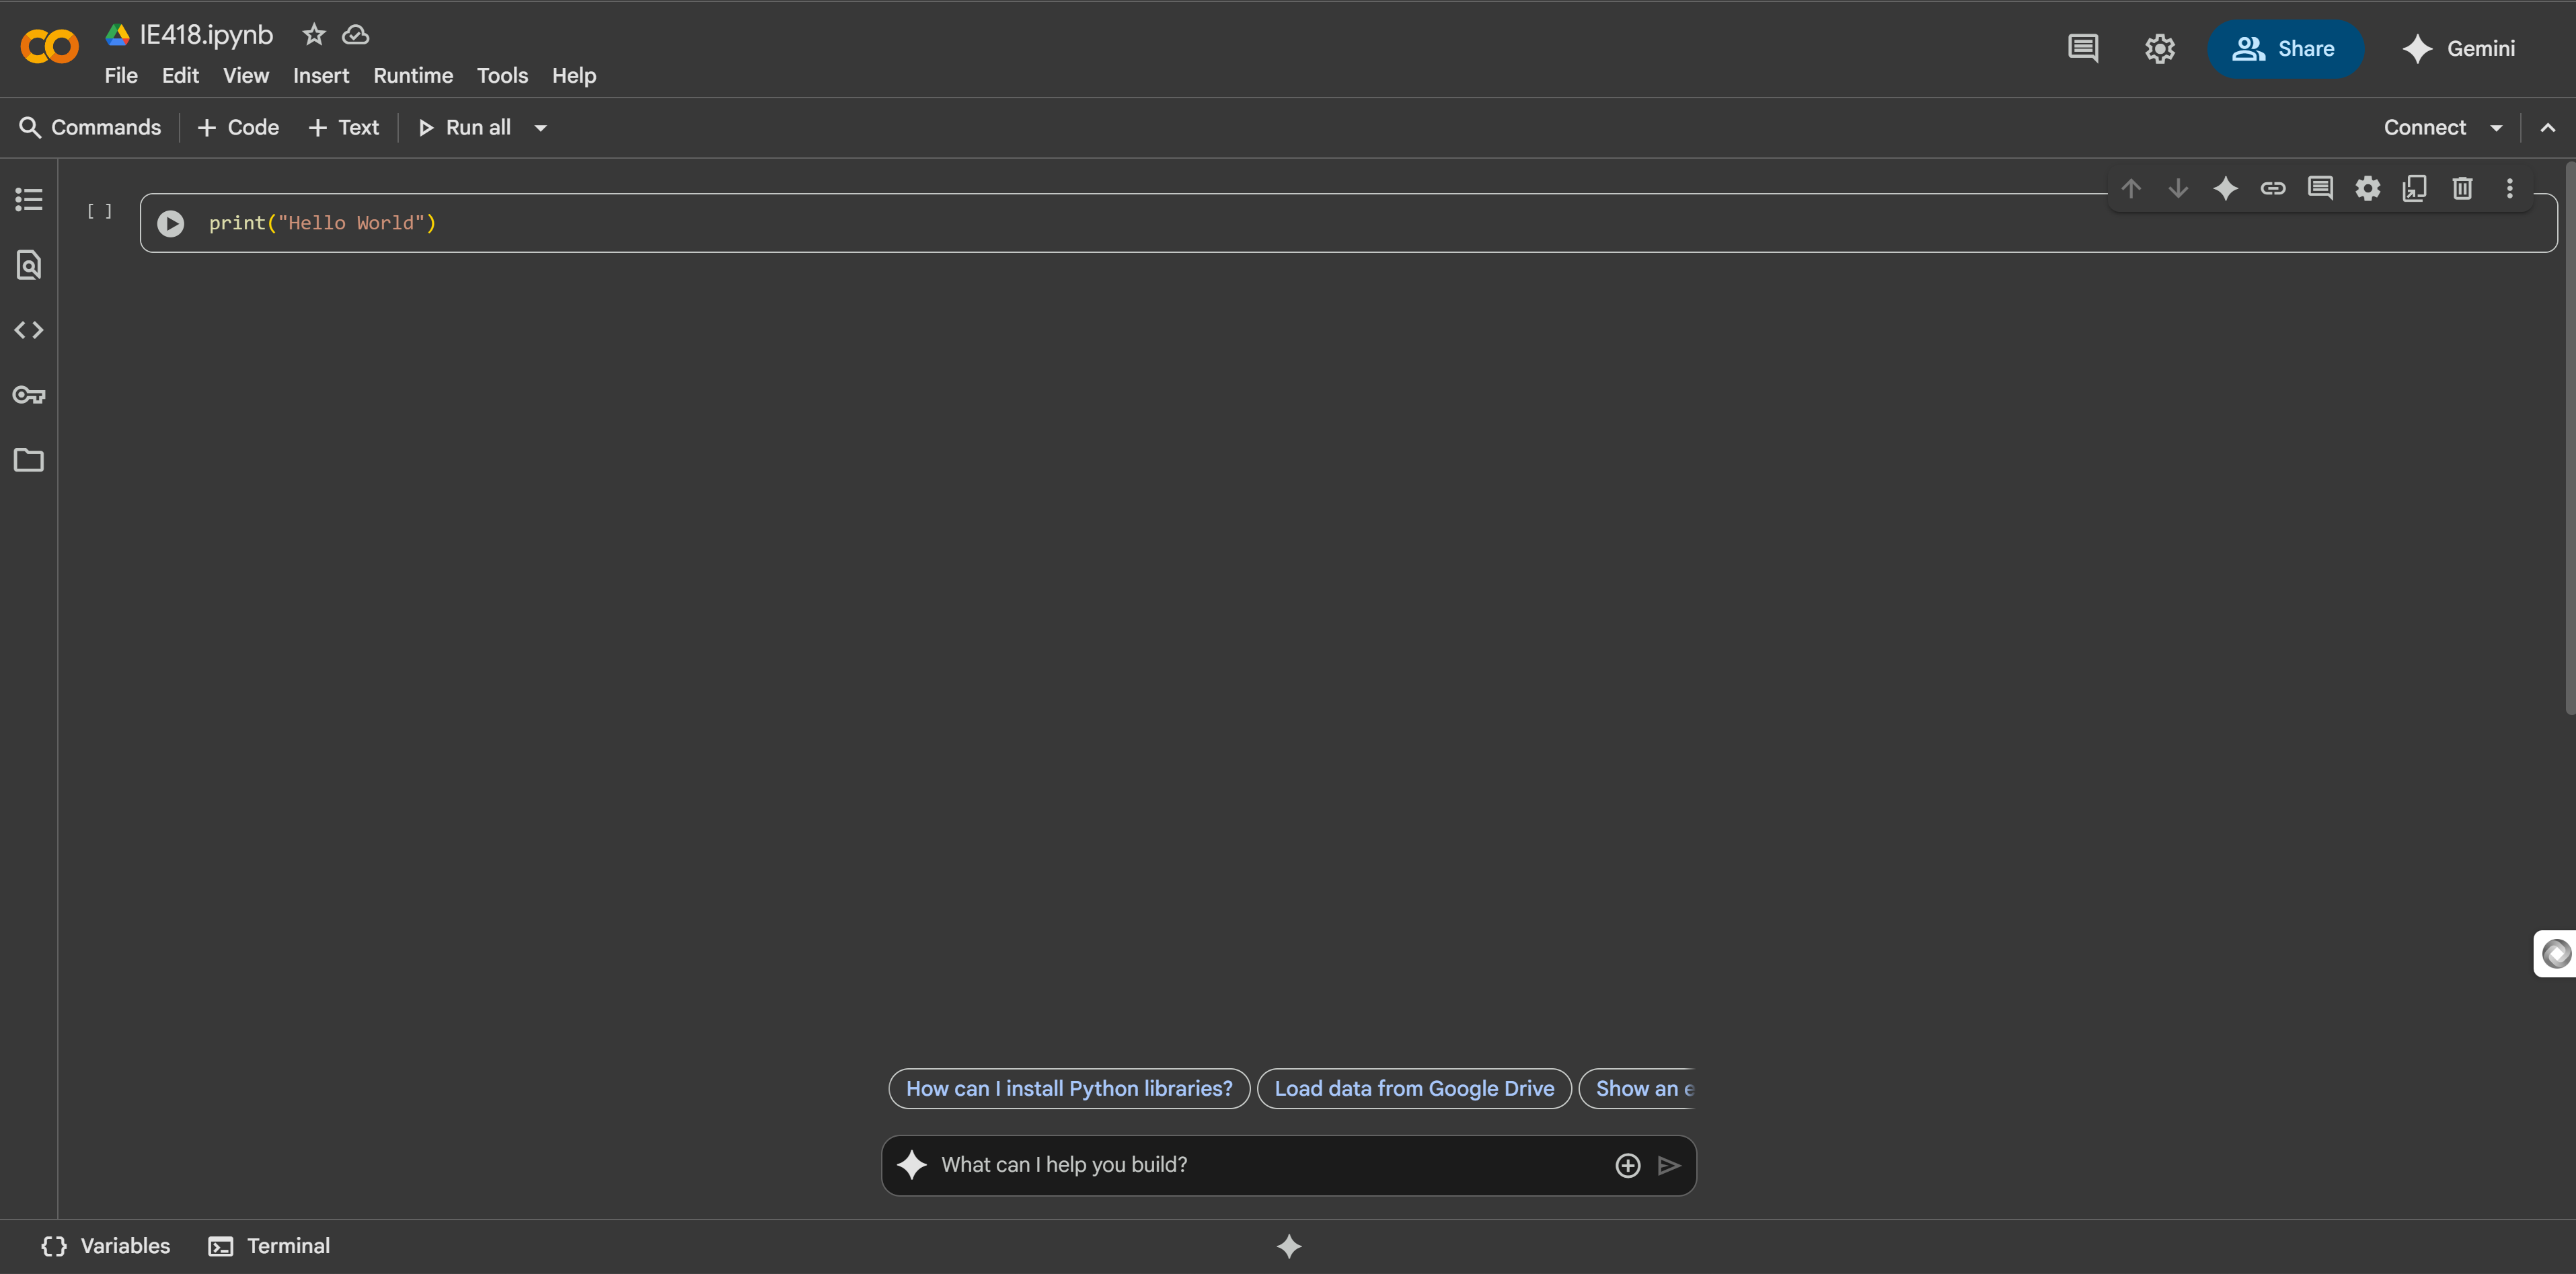
[+ Code] [+ Text]                    <- Add new cells
━━━━━━━━━━━━━━━━━━━━━━━━━━━━━━━━━━━
[ ] print("Hello World")    ▶️       <- Code cell with Run button
━━━━━━━━━━━━━━━━━━━━━━━━━━━━━━━━━━━
    Hello World                      <- Output appears below
━━━━━━━━━━━━━━━━━━━━━━━━━━━━━━━━━━━
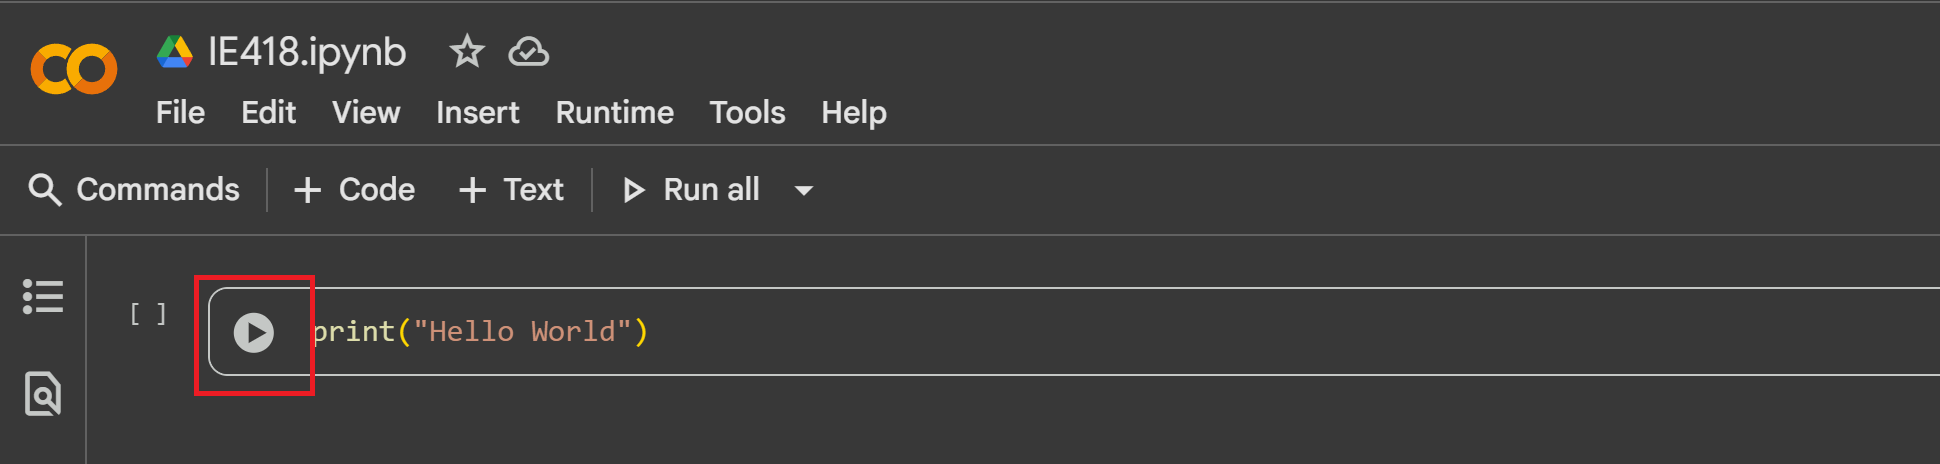
Running Code in Colab
Method 1: Click the Play Button
Hover over a code cell
Click the ▶️ button that appears on the left
Method 2: Keyboard Shortcuts
- Shift + Enter - Run cell and move to next
- Ctrl/Cmd + Enter - Run cell and stay in place
Try It Yourself!
# Type this in a code cell and run it:
print("Welcome to Google Colab!")
print("Python is ready to use!")

# You can run multiple lines at once
name = "Student"
age = 18
print(f"Hello {name}, you are {age} years old")
Colab-Specific (Jupyter notebook) Features
1. Code Cells vs Text Cells
Code Cells - For Python code:
# This is a code cell
x = 5
y = 10
print(x + y)  # Output: 15
Text Cells - For notes and explanations:
- Double-click any text to edit
- Use bold, italic, and
code formatting. - Add headers (titles) with #, ##, ###
- Create lists and tables
2. Saving Your Work
- Automatic saving - Colab auto-saves to Google Drive
- Download notebook - File → Download → Download .ipynb
- Save to GitHub - File → Save a copy in GitHub
Tips for Using Colab Effectively
1. Organize with Sections
Use text cells to create clear sections:
# Part 1: Data Import
Description of what this section does...

# Part 2: Data Processing
Explanation of processing steps...
2. Cell Management Shortcuts
- A - Add cell above (in command mode)
- B - Add cell below (in command mode)
- Hold Control + Press M + D - Delete cell (press D twice)
- Hold Control + Press M + M - Change to text cell
- Hold Control + Press M + Y - Change to code cell
- Hold Control + Press M + H - Show all keyboard shortcuts
A Couple Common Gotchas and Solutions
Issue 1: Variables Disappear
Problem: Your variables are undefined after coming back Solution: Runtime disconnects after ~90 min of inactivity. Run all cells again with Runtime → Run all
Issue 2: Code Runs Out of Order
Problem: Errors because cells were run in the wrong order Solution: Runtime → Restart and run all
🎯 TASK: Getting Started with Google Colab
💡 What you’ll do: Create your first notebook and practice with cells
Individually:
Create a new notebook
Create a Text cell. Run the following:
# Lab 1
Enter your name and your labmate names in here.
## Write your name here
### Write the name of the other labmates here
Change the name of the file to the initial of your first name and your last name.
Experiment with code cells and text cells.
Each individual has to create a file.
Within your group:
Create a file for the group.
Create a Text cell.
# Lab 1
## Write the name of lab members
These files will be part of the assignment you upload.
Remember: Google Colab is useful for learning Python - less setup headaches! But there will be times in the future when IDEs/local coding will be necessary.
Your First Python Program
Now that we have our python notebook, we can begin practicing.
Create a coding cell and run the following code.
print("Hello World")
The print() function is Python’s way of displaying text on the screen - it’s like telling the computer “show this message to the user.” When you write print("Hello, World"), you’re giving the computer a specific instruction to display the words “Hello, World” on the screen. You will use this function quite often!
To run:
- Click ▶️ button (top-right)
Comments
Add notes that Python ignores using #:
print("Hello World")  # This is a comment
# Comments help explain your code
Data Types and Variables
Basic Data Types
Python has different types of data:
Strings - Text in quotes:
print("Hello")          # Double quotes
print('Hello')          # Single quotes work too
Integers - Whole numbers:
print(42)
Floats - Decimals:
print(3.14)
Important: "25" (string) ≠ 25 (integer). More on this later!
Math Operations
| Operator | Name | Example | Result |
|---|---|---|---|
+ | Addition | 5 + 3 | 8 |
- | Subtraction | 10 - 4 | 6 |
* | Multiplication | 6 * 7 | 42 |
/ | Division | 15 / 4 | 3.75 |
** | Power | 2 ** 3 | 8 |
🎯 TASK: Basic Calculator
💡 What you’ll learn: Difference between calculations and strings
Run the following codes in different cells:
# Task: Create a simple calculator output
# Calculate and display basic math problems

print("Welcome to My Calculator!")
print("Addition: 15 + 7 =", 15 + 7)
print("Subtraction: 20 - 8 =", 20 - 8)
print("Multiplication: 6 * 4 =", 6 * 4)
print("Division: 25 / 5 =", 25 / 5)
# Task: Create a simple calculator output
# Calculate and display basic math problems

print("Welcome to My Calculator!")
print("Addition: 15 + 7 =", "15 + 7")
print("Subtraction: 20 - 8 =", "20 - 8")
print("Multiplication: 6 * 4 =", "6 * 4")
print("Division: 25 / 5 =", "25 / 5")
Question (answer in text block following code): Compare the results of the cells. What is the difference between the outputs? What makes them different? Process:
- Individually: Work on the task for a few minutes (within your individual notebook)
- Group: Discuss individual solutions and write down the consensus solution in your group jupyter notebook
Variables: Storing Information
Problem 1
Imagine scaling button sizes by 50% for mobile:
# Without variables - tedious and error-prone:
print(200 * 0.5) # width of button 1
print(200 * 0.5) # height of button 1
print(150 * 0.5) # width of button 2
print(400 * 0.5) # height of button 2

# If we need 40% instead, we change EVERYTHING! (and finding issues with the code becomes even more difficult)
print(200 * 0.4) # width of button 1
print(200 * 0.4) # height of button 1
print(150 * 0.4) # width of button 2
print(400 * 0.5) # height of button 2
Our problem here is that if we need to change scale (or width or height) we need to change every print statement!
A Solution to Problem 1
# With variables - change once, update everywhere:
button_scale = 0.5

button1_width = 200
button1_height = 200
button2_width = 150
button2_height = 400

print(button1_width * button_scale)
print(button1_height * button_scale)
print(button2_width * button_scale)
print(button2_height * button_scale)

button_scale = 0.4

print(button1_width * button_scale)
print(button1_height * button_scale)
print(button2_width * button_scale)
print(button2_height * button_scale)
Note that in copying over direct values we introduced a bug in our first example (without variables) that results in different output between the two sets of code. Did you spot the difference?
Problem 2: Tracking Values
Imagine a restaurant ordering interface showing the running total:
# Without variables - impossible to track the total!
print("Wellcome to the restaurant! Current total: 0")
print("Burger added: $8.99")
print("Current total: $8.99")  # Fillout the value with the correct value
print("Fries added: $3.50")
print("Current total: $(Calculate and fill)")  # Manual calculation again! Fillout the value with the correct value
print("Drink added: $2.99")
print("Current total: $(Calculate and fill)")  # Getting harder... Fillout the value with the correct value
# How do we apply tax? How do we know the final amount?
With variables - we can track and update:
total = 0
total = total + 8.99  # Burger
print("Burger added. Total: $", total)
total = total + 3.50  # Fries
print("Fries added. Total: $", total)
total = total + 2.99  # Drink
print("Drink added. Total: $", total)
#TODO add tax (6% of total value) and print the final total
Variable Rules
✅ Good:
student_name = "Alice"
age = 18
❌ Bad:
2fast = "Bob"    # Can't start with number
my name = "Eve"  # No spaces allowed
Changing Variables
counter = 0
counter = counter + 1  # Right side calculated first, then assigned
print(counter)  # Shows: 1
Making Programs Interactive
The input() function gets text from users:
name = input("Enter your name: ")
print("Hello,", name)  # Comma automatically adds space
Important: input() always returns a string (text)! Just like you can’t subtract the number 10 from “hello”, you can’t subtract number 19 from “8”
Converting Types
# Wrong - can't add string to number:
age = input("Your age: ")  # Returns "25" (string)
# print(age + 10)  # Error! Try it

# Correct - convert to integer:
age = input("Your age: ")  # age is string (text)! If We want to do math operations, need to convert it to number
age = int(age) # int(age) converts the age from string to integer.
print("In 10 years:", age + 10) # Now we can do math opertations with the age
Use int() for whole numbers, float() for decimals.
🎯 TASK: Restaurant Payment System
💡 What you’ll learn: Working with variables, user input, and calculations
Consider the earlier example:
total = 0
total = total + 8.99  # Burger
print("Burger added. Total: $", total)
total = total + 3.50  # Fries
print("Fries added. Total: $", total)
total = total + 2.99  # Drink
print("Drink added. Total: $", total)
#TODO add tax (6% of total value) and print the final total
Your tasks:
- Add tax (6% of total value) and print the final total
- Give the user the ability to enter the amount of cash they want to pay (message: “Please enter your cash amount”)
- Tell the user how much change they can expect to receive
Process:
- Individually: Work on the task for 5 minutes (within your individual notebook)
- Group: Discuss individual solutions and write down the consensus solution in your group jupyter notebook
Boolean Variables and Logic
What are Boolean Variables
Boolean variables can only hold two values: True or False. Think of them like light switches - they’re either ON (True) or OFF (False).
# Creating boolean variables
is_student = True
has_homework = False
is_logged_in = True
game_over = False

print("Are you a student?", is_student)        # True
print("Do you have homework?", has_homework)   # False
print("Are you logged in?", is_logged_in)      # True
print("Is the game over?", game_over)          # False
Important: Notice that True and False are capitalized and have no quotes around them!
# Correct way
is_sunny = True    # This is a boolean

# Wrong way
is_sunny = "True"  # This is a string, not a boolean!
Booleans from Comparisons
Often, boolean values come from comparing things:
age = 18
temperature = 75
score = 85

# These comparisons create boolean values
is_adult = age >= 18           # True
is_hot = temperature > 80      # False
passed_test = score >= 70      # True
is_perfect = score == 100      # False

print("Is adult:", is_adult)           # True
print("Is hot outside:", is_hot)       # False
print("Passed the test:", passed_test) # True
print("Perfect score:", is_perfect)    # False
Boolean Logic: Combining True/False
Now that you understand boolean variables, let’s learn how to combine multiple True/False conditions using logical operators. This is essential for making complex decisions in your programs!
The Three Logical Operators
1. and - Both conditions must be True
# Restaurant example
age = 20
has_id = True

can_enter_bar = age >= 21 and has_id
print("Can enter bar:", can_enter_bar)  # False (age not >= 21)

# Both conditions must be True
is_weekend = True
is_sunny = True
good_for_picnic = is_weekend and is_sunny
print("Good for picnic:", good_for_picnic)  # True
2. or - At least one condition must be True
# Payment methods
has_cash = False
has_card = True

can_pay = has_cash or has_card
print("Can pay:", can_pay)  # True (has card)

# Weather conditions
is_sunny = False
has_umbrella = True
can_go_outside = is_sunny or has_umbrella
print("Can go outside:", can_go_outside)  # True
3. not - Flips True to False (and vice versa)
# Security system
door_locked = True
can_enter = not door_locked
print("Can enter:", can_enter)  # False

# Game status
game_over = False
game_running = not game_over
print("Game running:", game_running)  # True
Combining Multiple Conditions
# Complex decision making
temperature = 75
is_raining = False
has_time = True

# Perfect conditions for a walk
good_for_walk = temperature > 60 and not is_raining and has_time
print("Good for walk:", good_for_walk)  # True

# Library access
is_student = True
has_library_card = False
faculty_member = False

can_access_library = is_student or has_library_card or faculty_member
print("Can access library:", can_access_library)  # True
Truth Tables - Understanding the Logic
and Truth Table
print("and Truth Table:")
print("True and True =", True and True)    # True
print("True and False =", True and False)  # False
print("False and True =", False and True)  # False
print("False and False =", False and False) # False
or Truth Table
print("or Truth Table:")
print("True or True =", True or True)      # True
print("True or False =", True or False)    # True
print("False or True =", False or True)    # True
print("False or False =", False or False)  # False
not Truth Table
print("not Truth Table:")
print("not True =", not True)   # False
print("not False =", not False) # True
Examples
Example 1: Online Shopping Cart
# Shopping cart validation
cart_total = 25.50
has_coupon = True
is_member = False

# Free shipping conditions
free_shipping = cart_total >= 25 or has_coupon or is_member
print("Free shipping:", free_shipping)  # True

# Discount eligibility
discount_eligible = is_member and cart_total > 50
print("Discount eligible:", discount_eligible)  # False
Example 2: App Login System
# User authentication
username_correct = True
password_correct = True
account_locked = False

# Successful login conditions
can_login = username_correct and password_correct and not account_locked
print("Can login:", can_login)  # True

# Security alert conditions
security_alert = not username_correct or not password_correct
print("Security alert:", security_alert)  # False
Practice tinkering
Run and tinker with the code below to ensure you understand the concepts.
Practice 1: Grade Calculator
# Determine if student passes the class
midterm_score = 85
final_score = 78
attendance_rate = 0.9  # 90%

# Passing conditions: (midterm >= 70 AND final >= 70) OR attendance >= 95%
passes_class = (midterm_score >= 70 and final_score >= 70) or attendance_rate >= 0.95
print("Student passes:", passes_class)
Practice 2: Weather Decisions Create a program that decides if it’s good weather for outdoor activities:
temperature = 72
humidity = 60  # percentage
wind_speed = 5  # mph
is_raining = False

# Good weather: temp between 65-85, humidity < 70%, wind < 15mph, not raining
good_weather = (65 <= temperature <= 85 and
                humidity < 70 and
                wind_speed < 15 and
                not is_raining)
print("Good weather for outdoors:", good_weather)
Practice 3: Access Control System
# Build an access control system
employee_id = "E12345"
has_badge = True
is_weekend = False
is_emergency = False

# Access granted: (has valid ID AND has badge AND not weekend) OR emergency
valid_id = len(employee_id) == 6 and employee_id.startswith("E") # Yes you can check if a string starts with a string.
access_granted = (valid_id and has_badge and not is_weekend) or is_emergency
print("Access granted:", access_granted)
🎯 TASK: Boolean Logic Practice
💡 What you’ll learn: Using boolean operators for decision making
Task 1: Define a username and a password. Then ask user to enter a username and a password. If both username and password match, print: “access granted: True”, if they don’t print: “access granted: False”. It may be useful to start with the code from Practice 3.
Task 2: Ask user to enter their midterm and final score. If the average is greater than 85, and both midterm and final scores are greater than 70, the user has passed. If not, the user has failed. Write code that prints True if the user has passed and False if the user has failed. It may be useful to start with the code from Practice 1.
Lists: Collections of Items
If variables are boxes we fill with values, lists are shelves where we can organize the boxes. Take the following example: There are multiple orders coming from different groups. Let’s say group 1 orders “pizza”, “burger”, and “salad”, and group 2 orders “fried chicken” and “hot dog”.
If we want to use variables:
# Each food will be saved in one variable. Hard to track which food is for whom.
order1 = "Pizza"
order2 = "Burger"
order3 = "Salad"
order4 = "fried chicken"
order5 = "hot dog"
Imagine what chaos it will create, managing the data. That is why we need a new type of variable: list. Use a list:
# Good approach:
order1 = ["Pizza", "Burger", "Salad"]
order2 = ["fired chicken", "hot dog"]
Lists can store multiple values in an organized space. Each value is accessable based on its position in the list. Remember, Python starts counting from zero. For example in order 1, Pizza is in zeroeth position, Burger is in first position and Salad is in second position. Let’s see this in action:
# Good approach:
order1 = ["Pizza", "Burger", "Salad"]
order2 = ["fired chicken", "hot dog"]
print(order1[0]) # To determine within position you want to access, you indicate the number in the bracket. Change the number in the bracket and see what happens!
List Operations
# Create and modify
menu = []                    # Create an empty list
menu.append("Pizza")         # Add item
menu.append("Burger")
print(menu[0])              # Access first item (Pizza)
print(menu[-1])             # Access last item (Burger)
print(len(menu))            # Number of items

# Useful functions
numbers = [10, 5, 8]
print(sum(numbers))         # Total: 23
print(max(numbers))         # Largest: 10
print(min(numbers))         # Smallest: 5
Note: List indexing starts at 0!
🎯 TASK: Grade Tracker
💡 What you’ll learn: Working with lists and user input
Create an empty list. Ask the user to enter three grades (you need to ask them three times and receive one grade each time). Save them in a list. Then find the minimum, maximum, and average of the grades.
Process:
- Individually: Spend 5 minutes on the task (within your individual notebook)
- Group: Discuss solutions and write the consensus code in the group file
Dictionaries: Data with Labels
If lists are like shelves where you find items by position (first, second, third…), then dictionaries are like phone books where you look up information by name!
Problem with Lists
Imagine storing student information:
# Using lists - confusing and error-prone!
student = ["Alice", 18, "Computer Science", 3.8]
# Which position was the GPA again? Position 3? Position 2?
print("GPA:", student[3])  # Hard to remember what each position means
The Dictionary Solution
# Using dictionary - clear and readable!
student = {
    "name": "Alice",
    "age": 18,
    "major": "Computer Science",
    "gpa": 3.8
}
print("GPA:", student["gpa"])  # Much clearer!
Think of a dictionary like a real dictionary:
- Word (key) → Definition (value)
- “name” (key) → “Alice” (value)
Creating and Using Dictionaries
# Creating a menu with prices
menu = {
    "pizza": 12.99,
    "burger": 8.99,
    "salad": 6.50,
    "drink": 2.99
}

# Access values using keys
print("Pizza costs:", menu["pizza"])
print("Burger costs:", menu["burger"])
print("Salad costs:", menu["salad"])

# Get user input and show price
item = input("What would you like? ")
print("You ordered:", item)
print("Price: $", menu[item])  # Look up price using the key
Dictionary Operations
# Create empty dictionary
inventory = {}

# Add items
inventory["apples"] = 50
inventory["bananas"] = 30
inventory["oranges"] = 25

print("Apple quantity:", inventory["apples"])
print("Banana quantity:", inventory["bananas"])

# Update existing item
inventory["apples"] = 45  # New quantity
print("Updated apple quantity:", inventory["apples"])

# Add a new item
inventory["grapes"] = 20
print("Grape quantity:", inventory["grapes"])
Another Dictionary Example
# Store app settings
app_settings = {
    "theme": "dark",
    "notifications": "on",
    "language": "english",
    "font_size": 14
}

print("Current theme:", app_settings["theme"])
print("Font size:", app_settings["font_size"])

# Change a setting
app_settings["theme"] = "light"  # User changed theme
print("New theme:", app_settings["theme"])
🎯 TASK: Dictionary Practice
💡 What you’ll learn: Working with dictionaries for data management
Task 1: Using the app_settings dictionary as shown in the previous example, ask the user what setting they want to change. Then ask for what value they want for that setting. Then change the setting.
Task 2: Consider this contact dictionary:
# Store contact information
contact = {
    "name": "John Smith",
    "phone": "555-1234",
    "email": "john@email.com",
    "city": "New York"
}

print("Contact:", contact["name"])
print("Phone:", contact["phone"])
print("Email:", contact["email"])
How can we let the user create a new contact? Write the code to ask for user input and create a contact dictionary.
Dictionary vs List: When to Use What?
Use Lists when:
- Order matters (rankings, steps in a process)
- You access items by position
- You have simple collections of similar items
high_scores = [9500, 8200, 7100]  # Order matters - 1st, 2nd, 3rd place
print("First place:", high_scores[0])
Use Dictionaries when:
- You need to look up information by name/label
- You want to associate related pieces of information
- Order doesn’t matter
user_profile = {
    "username": "gamer123",
    "level": 15,
    "score": 9500
}
print("Username:", user_profile["username"])
print("Current level:", user_profile["level"])
Quick Reference
| Concept | Example |
|---|---|
print("Hello") | |
| Variable | name = "Alice" |
| Comment | # This is a note |
| Input | age = input("Age: ") |
| Convert | int("25") → 25 |
| List | items = [1, 2, 3] |
| Append | items.append(4) |
| Import | import random |
Summary
You’ve learned:
- ✅ How to write and run Python code
- ✅ Variables to store information
- ✅ Getting user input
- ✅ Lists for collections
- ✅ Using libraries
🎯 FINAL TASK: Reflection (GROUP FILE ONLY!)
💡 Reflect on what you’ve learned
Think about the functions you came up with in the last lab. What connections do you see between the concepts introduced/used within this lab and those in the previous lab.
📋 Deliverables
Two files need to be uploaded:
- Individual files - Each person creates their own notebook
- Group file - One shared notebook for the group
Important: The solutions for each task need to be separated by a text cell.
📊 How is my lab graded?
| Graded item | Points |
|---|---|
| Individual File - Getting Started | 2 pts |
| Individual File - Code Experimentation | 2 pts |
| Individual File - Basic Python Practice | 2 pts |
| Individual File - File Organization | 2 pts |
| Individual File - Name & Labeling | 2 pts |
| Individual File - Effort & Completion | 2 pts |
| Group File - Basic Calculator Task | 4 pts |
| Group File - Restaurant Payment System | 4 pts |
| Group File - Boolean Logic Practice | 4 pts |
| Group File - Grade Tracker | 4 pts |
| Group File - Dictionary Practice | 2 pts |
| Group File - Final Reflection | 3 pts |
| Group File - Organization & Collaboration | 3 pts |
Total points possible: 36 pts
📝 Grading Notes:
- Individual Files (12 pts): Reasonable attempt and effort is sufficient for full points
- Group File (24 pts): Focus on correct implementation and evidence of collaboration
- Late submissions: Follow course late policy
- Code must run: Non-functional code will receive partial credit
📝 Task Checklist - What to Include in Your Files
Make sure your notebooks contain solutions to all of these tasks:
✅ Individual File Tasks:
- Getting Started with Google Colab
- Create notebook with your name and labmate names
- Rename file to initial + last name
- Practice with code and text cells
- Basic Calculator Task
- Two versions of calculator code (with and without quotes)
- Explanation of the difference between outputs
- Restaurant Payment System
- Code tinkering and partial solution before coming to group
- Boolean Logic Practice
- Code tinkering and partial solution before coming to group
- Grade Tracker
- Code tinkering and partial solution before coming to group
✅ Group File Tasks:
- Getting Started with Google Colab
- Group notebook with all member names
- Basic Calculator Task
- Two versions of calculator code (with and without quotes)
- Explanation of the difference between outputs
- Restaurant Payment System
- Complete restaurant ordering code with tax calculation
- User input for cash payment
- Change calculation and display
- Boolean Logic Practice
- Username/password verification system
- Grade pass/fail checker with multiple conditions
- Grade Tracker
- List to store three user-entered grades
- Calculate and display min, max, and average
- Dictionary Practice
- App settings modifier (let user change settings)
- Contact creator (user input to create new contact)
- Final Reflection
- Written reflection on concepts needed for previous lab functions
📋 File Organization:
- Each task should be in its own section
- Use text cells to separate and label each task
- Include clear headings and explanations
- Make sure all code runs without errors
🎯 Grading Focus:
- Completeness: All tasks attempted and working
- Organization: Clear structure with proper labeling
- Functionality: Code executes correctly
- Collaboration: Evidence of group discussion in consensus solutions
Drafted by Amirreza Bagherzadehkhorasani and modified by Chris Dancy