LAB 06 - Methods in Python and Introduction to Qt
Transform your code from repetitive scripts into reusable building blocks using methods, then bring your programs to life with graphical user interfaces using Qt!
💡 Note: This lab builds on concepts from Labs 04 and 05. Each person and each group will be turning in Colab files’ link and a Python file for the Qt portion.
Why Methods and UI?
Imagine you’re building a calculator app:
- Without methods → You’d write the same calculation code over and over
- With methods → Write once, use anywhere:
calculate_total(price, tax)
And for the interface:
- Without UI → Users type commands in a terminal (intimidating!)
- With UI → Beautiful buttons, text fields, and displays (user-friendly!)
By the end of this lab, you’ll be able to create programs that are both smart (using methods) and beautiful (using Qt).
Part 1: Methods - Your Code’s Building Blocks
What Are Methods?
A method (also called a function) is like a recipe or instruction manual:
- It has a name
- It takes ingredients (parameters)
- It follows steps (code)
- It produces a result (return value)
Instead of writing the same code multiple times, you write it once as a method and call it whenever needed.
Without Methods (The Problem)
# Calculating tax three times - so repetitive!
price1 = 10.00
tax1 = price1 * 0.06
total1 = price1 + tax1
print("Total 1:", total1)

price2 = 25.50
tax2 = price2 * 0.06
total2 = price2 + tax2
print("Total 2:", total2)

price3 = 7.99
tax3 = price3 * 0.06
total3 = price3 + tax3
print("Total 3:", total3)
With Methods (The Solution)
def calculate_total(price):
    tax = price * 0.06
    total = price + tax
    return total

# Now we can reuse it!
print("Total 1:", calculate_total(10.00))
print("Total 2:", calculate_total(25.50))
print("Total 3:", calculate_total(7.99))
Basic Method Structure
def method_name(parameters):
    # Do something with parameters
    result = some_calculation
    return result
Key Components:
def- Tells Python you’re defining a method- Method name - What you’ll use to call it
- Parameters - The inputs (can be zero or more)
- Body - The code that runs (indented)
return- The output (optional)
Examples to Try
Example 1: Simple Greeting
def greet(name):
    message = "Hello, " + name + "!"
    return message

# Using the method
result = greet("Alice")
print(result)  # Output: Hello, Alice!

# Or directly
print(greet("Bob"))  # Output: Hello, Bob!
Example 2: Multiple Parameters
def calculate_rectangle_area(width, height):
    area = width * height
    return area

# Using the method
room_area = calculate_rectangle_area(10, 12)
print("Room area:", room_area, "sq ft")  # Output: Room area: 120 sq ft
Example 3: Method Without Return
def print_receipt(item, price):
    print("=" * 30)
    print("RECEIPT")
    print("Item:", item)
    print("Price: $", price)
    print("=" * 30)
    # No return statement - just prints

# Using the method
print_receipt("Pizza", 12.99)
💡 Tip: If a method doesn’t have a return statement, it returns None by default.
🎯 TASK 1: Temperature Converter
Individually:
- Create a method called
celsius_to_fahrenheitthat:- Takes a Celsius temperature as parameter
- Returns the Fahrenheit equivalent
- Formula: F = (C × 9/5) + 32
- Create another method called
fahrenheit_to_celsiusthat does the opposite- Formula: C = (F - 32) × 5/9
- Test both methods with at least 3 different temperatures
Group Collaboration:
- Compare your solutions, reach a consensus
- Discuss: What would happen without methods? How many lines would you save?
Part 2: Methods with Lists and Dictionaries
Methods become even more powerful when working with collections!
Working with Lists in Methods
def calculate_average(grades):
    total = sum(grades)
    count = len(grades)
    average = total / count
    return average

# Using it
test_scores = [85, 92, 78, 95, 88]
avg = calculate_average(test_scores)
print("Class average:", avg)
Elaborate 1
Now try a single number for test_scores. Does it work? What if test_scores are a dictionary? Would it still work.
Working with Dictionaries in Methods
def calculate_order_total(order, menu):
    total = 0
    for item in order:
        if item in menu:
            total += menu[item]
    return total

# Using it
restaurant_menu = {
    "burger": 8.99,
    "fries": 3.50,
    "drink": 2.99
}

customer_order = ["burger", "fries", "drink"]
bill = calculate_order_total(customer_order, restaurant_menu)
print("Total bill: $", bill)
🎯 TASK 2: Shopping Cart Methods
Individually:
Create these methods:
add_to_cart(cart, item, price)- Adds an item to a cart dictionarycalculate_cart_total(cart)- Returns the total of all itemsapply_discount(total, discount_percent)- Returns discounted total
Example usage:
# Your methods here...

# Test your methods
my_cart = {}
add_to_cart(my_cart, "laptop", 999.99)
add_to_cart(my_cart, "mouse", 25.50)
total = calculate_cart_total(my_cart)
final = apply_discount(total, 10)  # 10% discount
print("Final price after discount: $", final)
Group Collaboration:
- Compare implementations
- Discuss: How do methods make the code more organized?
Part 3: Methods Calling Other Methods
Methods can call other methods! This is how we build complex programs from simple pieces.
Example: Restaurant System
def calculate_subtotal(items, menu):
    total = 0
    for item in items:
        if item in menu:
            total += menu[item]
    return total

def calculate_tax(subtotal, tax_rate):
    return subtotal * tax_rate

def calculate_tip(subtotal, tip_percent):
    return subtotal * (tip_percent / 100)

def calculate_final_bill(items, menu):
    # This method uses other methods!
    subtotal = calculate_subtotal(items, menu)
    tax = calculate_tax(subtotal, 0.06)
    tip = calculate_tip(subtotal, 18)

    final = subtotal + tax + tip
    return final

# Using it
menu = {"burger": 10, "fries": 5, "drink": 3}
order = ["burger", "fries", "drink"]
total = calculate_final_bill(order, menu)
print("Total with tax and tip: $", total)
🎯 TASK 3: Grade Management System
Individually:
Create a grade management system with these methods:
calculate_average(grades)- Returns average of a list of gradesget_letter_grade(average)- Returns A, B, C, D, or F based on averageprint_report_card(name, grades)- Uses the above methods to print a nice report
Rules for letter grades:
- 90+ = A
- 80-89 = B
- 70-79 = C
- 60-69 = D
- Below 60 = F
# Your methods here...


# Test your methods
student_grades = [85, 92, 78, 90, 88]
avg = calculate_average(student_grades)
letter = get_letter_grade(avg)
print(f"Average: {avg}")
print(f"Letter Grade: {letter}")
print("\n")
print_report_card("John Doe", student_grades)
Group Collaboration:
- Compare solutions
- Test edge cases (empty list, perfect scores, etc.)
Part 4: Introduction to Qt - Building User Interfaces
Note: If you are working on your own machine (instead of the lab machine), then you should follow the directions to install python 3.12 and VS code before continuing
Now let’s make our programs visual! Qt is a powerful framework for creating graphical user interfaces (GUIs).
Installing PySide6
First, we need to install pyside6, the python library that will let us use the QT GUI system.
Within Visual studio code, complete the following steps:
1) Open up the terminal (terminal -> New terminal)
Now you should have a terminal window that appeared at the bottom of your screen 
2) Now type the following command into your terminal window
If on Windows
pip install PySide6
If on Mac
pip3 install PySide6
Great, now you should have the libraries you need! If you got an error when you tried to install pyside6 do a little debugging and/or ask your instructor for some help.
Your First Qt Window
Important: This code won’t work properly in Colab! Qt applications need to run locally.
In VS Code, create a new file and type the following code in the file and save it with some name and a location (folder/directory) that you can find.
Make sure you use
FILENAME.py, as in you remember to give the file a .py extension (so VS Code knows it is a python file!)
import sys
from PySide6.QtWidgets import QApplication, QWidget

# Create the application
app = QApplication(sys.argv)

# Create a window
window = QWidget()
window.setWindowTitle("My First Qt App")
window.resize(400, 300)  # Width, Height
window.show()

# Run the application
sys.exit(app.exec_())
This code should just create a new empty QT window
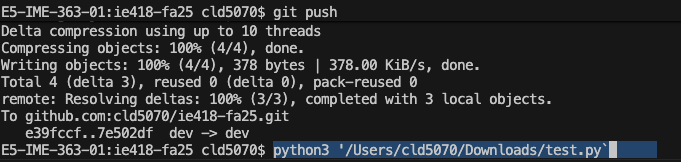
You can now run this code by going to your terminal window and typing in the following:
If on Windows
python LOCATION-of-FILE\FILE-NAME
If on a Mac
python3 LOCATION-of-FILE\FILE-NAME
How do I know the location of the file I’ve created?
1) Once you’ve saved your file, you should be able to move the mouse cursor up to where the folders are shown:
2) With your cursor over the right-most folder, hold a left-click and drag your cursor down to the terminal window and release (here, I would drag Downloads down and it would result in the path being added to my terminal line):
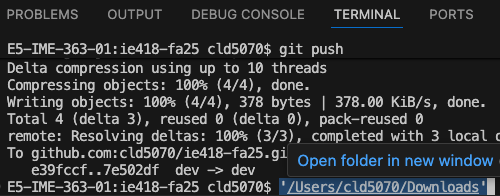
Once you have this, with your terminal window active (i.e., click down in the window), you can use your arrow key to move the active cursor to the far left side of the line. Now, you can type in the python command you need (python or python3). Now, use the right arrow to navigate to the end of the line and type in either /NAMEOFPYTHONFILE.py (Mac) or \NAMEOFPYTHONFILE.py (Windows) where you are substituting the name of your file. The example below shows running a python command for a file named test.py in my Downloads folder/directory on a Mac:
Understanding Qt Widgets
Before we start building interfaces, let’s understand what widgets are in Qt.
What Are Widgets?
Think of widgets as the building blocks of your graphical interface - like LEGO pieces for your app! Each widget is a visual element that users can see and interact with.
Real-World Analogy
Imagine a physical calculator:
- The screen that displays numbers → QLabel widget
- The number buttons you press → QPushButton widgets
- The clear button → Another QPushButton widget
- The entire calculator case that holds everything → QWidget (the main window)
Common Qt Widgets and Their Purposes
1. QWidget - The Container
- The main window or base for your application
- Like a blank canvas or an empty room
- Other widgets live inside it
from PySide6.QtWidgets import QWidget
window = QWidget()  # Creates an empty window
2. QLabel - Text Display
- Shows text or images to the user
- User cannot edit it (read-only)
- Perfect for: titles, instructions, results
from PySide6.QtWidgets import QLabel
label = QLabel("Welcome to my app!")
Think of it as: A sign or poster on a wall
3. QPushButton - Clickable Button
- Users click it to trigger actions
- Can have text or icons
- Perfect for: submit buttons, action triggers
from PySide6.QtWidgets import QPushButton
button = QPushButton("Click Me!")
Think of it as: A doorbell or light switch
4. QLineEdit - Single Line Text Input
- Users can type text into it
- One line only
- Perfect for: names, passwords, single values
from PySide6.QtWidgets import QLineEdit
input_field = QLineEdit()
input_field.setPlaceholderText("Enter your name")
Think of it as: A fill-in-the-blank line on a form
5. QTextEdit - Multi-Line Text Area
- Users can type multiple lines of text
- Supports formatting
- Perfect for: notes, messages, displaying lists
from PySide6.QtWidgets import QTextEdit
text_area = QTextEdit()
Think of it as: A notepad or memo pad
Widget Comparison Table
| Widget | Purpose | User Can Edit? | Example Use |
|---|---|---|---|
| QWidget | Container/Window | N/A | Main window |
| QLabel | Display text/images | ❌ No | Show results |
| QPushButton | Trigger actions | ❌ No (but clickable) | Submit button |
| QLineEdit | Single-line input | ✅ Yes | Username field |
| QTextEdit | Multi-line input | ✅ Yes | Message box |
How Widgets Work Together
Widgets are organized using layouts (we’ll learn more about these soon):
from PySide6.QtWidgets import QLabel, QLineEdit, QPushButton, QVBoxLayout

# Create widgets
title = QLabel("My App")           # Display widget
name_input = QLineEdit()            # Input widget
submit_btn = QPushButton("Submit")  # Action widget

# Put them in a layout
layout = QVBoxLayout()  # Vertical arrangement
layout.addWidget(title)
layout.addWidget(name_input)
layout.addWidget(submit_btn)
This creates a vertical stack:
┌─────────────────┐
│     My App      │ ← QLabel
├─────────────────┤
│ [text input]    │ ← QLineEdit
├─────────────────┤
│    [Submit]     │ ← QPushButton
└─────────────────┘
Important Widget Concepts
1. Creating a Widget
from PySide6.QtWidgets import QLabel
label = QLabel("Hello")  # Creates it in memory
2. Configuring a Widget
label.setText("New text")           # Change the text
label.setStyleSheet("color: blue;") # Change appearance
3. Adding to Layout
layout.addWidget(label) # Makes it visible in the window
4. Connecting Actions (for buttons)
click_button = button.clicked  # When set the condition for when button is clicked
click_button.connect(my_function) # assigns a function for this case
or, if we want to make it easier:
button.clicked.connect(my_function)
Widget Properties You’ll Use Often
For QLabel:
label.setText("New text")      # Change text
text = label.text()            # Get current text
For QPushButton:
button.setText("Click Here")   # Change button text
button.clicked.connect(func)   # Connect to function
For QLineEdit:
input_field.setText("Default") # Set text
text = input_field.text()      # Get what user typed
input_field.clear()            # Clear the field
input_field.setPlaceholderText("Hint")  # Gray hint text
For QTextEdit:
text_area.setPlainText("Hello\nWorld")  # Set text
text = text_area.toPlainText()          # Get all text
text_area.clear()                       # Clear everything
Quick Widget Selection Guide
Need to show information? → Use QLabel
- “Welcome to the app!”
- “Result: 42”
- “Total: $10.50”
Need user to type something short? → Use QLineEdit
- Name
- Single number
- Password
Need user to type a lot? → Use QTextEdit
- Notes
- Comments
- Multiple items
- Paragraph of text
Need user to trigger an action? → Use QPushButton
- “Submit”
- “Calculate”
- “Clear”
- “Save”
Now that you understand widgets, let’s see them in action!
Adding Widgets (UI Elements)
import sys
from PySide6.QtWidgets import QApplication, QWidget, QLabel, QPushButton, QVBoxLayout

app = QApplication(sys.argv)

# Create main window
window = QWidget()
window.setWindowTitle("Simple UI")

# Create widgets
label = QLabel("Hello, Qt!")
button = QPushButton("Click Me!")

# Create layout and add widgets
layout = QVBoxLayout()
layout.addWidget(label)
layout.addWidget(button)

# Set the layout for the window
window.setLayout(layout)

window.show()
sys.exit(app.exec_())
Making Buttons Interactive
import sys
from PySide6.QtWidgets import QApplication, QWidget, QLabel, QPushButton, QVBoxLayout

def on_button_click():
    label.setText("Button was clicked!")

app = QApplication(sys.argv)

window = QWidget()
window.setWindowTitle("Interactive UI")

# Create widgets
label = QLabel("Click the button below")
button = QPushButton("Click Me!")

# Connect button to function
button.clicked.connect(on_button_click)

# Layout
layout = QVBoxLayout()
layout.addWidget(label)
layout.addWidget(button)
window.setLayout(layout)

window.show()
sys.exit(app.exec_())
Reminder on Common Qt Widgets you might need
Text Input
from PySide6.QtWidgets import QLineEdit

text_input = QLineEdit()
text_input.setPlaceholderText("Enter your name")
Text Display
from PySide6.QtWidgets import QTextEdit

text_area = QTextEdit()
text_area.setPlainText("This is a text area")
Layouts
- QVBoxLayout - Vertical arrangement
- QHBoxLayout - Horizontal arrangement
- QGridLayout - Grid arrangement
🎯 TASK 4: Simple Calculator UI
Individually:
Create a simple calculator with:
- Two QLineEdit fields for numbers
- Buttons for Add, Subtract, Multiply, Divide
- A QLabel to show the result
Here’s a starter template:
import sys
from PySide6.QtWidgets import QApplication, QWidget, QLineEdit, QPushButton,QLabel, QVBoxLayout # You need to imprt what you need here from PySide6.QtWidgets

def add_numbers():
    # Get numbers from input fields
    # Calculate and show result
    pass

def subtract_numbers():
    # Similar to add
    pass

app = QApplication(sys.argv)
window = QWidget()
window.setWindowTitle("Calculator")

# Create widgets
num1_input = QLineEdit()
num1_input.setPlaceholderText("Enter first number")

num2_input = QLineEdit()
num2_input.setPlaceholderText("Enter second number")

add_btn = QPushButton("Add")
subtract_btn = QPushButton("Subtract")
result_label = QLabel("Result will appear here")

# Connect buttons to functions

add_btn.clicked.connect(add_numbers)
subtract_btn.clicked.connect(subtract_numbers)


""" or if you want to be more specific
add_signal = add_btn.clicked
add_signal.connect(add_numbers)

subtract_signal = subtract_btn.clicked
subtract_signal.connect(subtract_numbers)
"""
# Create layout
layout = QVBoxLayout()
layout.addWidget(num1_input)
layout.addWidget(num2_input)
layout.addWidget(add_btn)
layout.addWidget(subtract_btn)
layout.addWidget(result_label)

window.setLayout(layout)
window.show()
sys.exit(app.exec_())
Group Collaboration:
- Share your calculators
- Add more operations (multiply, divide)
- Handle errors (division by zero, non-numeric input)
Part 5: Combining Methods with Qt
The real power comes from combining methods with UI!
Elaborate: Temperature Converter App
Complete this code. Run it and explain how it works. How does it handle users who enter information that the system is not designed for.
import sys
from PySide6.QtWidgets import *

# Our methods from earlier
def celsius_to_fahrenheit(celsius):
    # complete this fucntion

def fahrenheit_to_celsius(fahrenheit):
    # complete this fucntion

# UI handlers
def convert_to_f():
    # Here we learn how to generate errors in the code!
    try:
        celsius = float(celsius_input.text())
        fahrenheit = celsius_to_fahrenheit(celsius)
        # In the previous task, we examined what happens if you enter a string like "Twenty eight" instead of 28
        result_label.setText(f"{celsius}°C = {fahrenheit:.1f}°F")
    except ValueError:
        result_label.setText("Please enter a valid number") # It will let the user know what the error is!

def convert_to_c():
    try:
        fahrenheit = float(fahrenheit_input.text())
        celsius = fahrenheit_to_celsius(fahrenheit)
        result_label.setText(f"{fahrenheit}°F = {celsius:.1f}°C")
    except ValueError:
        result_label.setText("Please enter a valid number")

# Create the application
app = QApplication(sys.argv)
window = QWidget()
window.setWindowTitle("Temperature Converter")

# Create widgets
celsius_input = QLineEdit()
celsius_input.setPlaceholderText("Enter Celsius")

fahrenheit_input = QLineEdit()
fahrenheit_input.setPlaceholderText("Enter Fahrenheit")

to_f_btn = QPushButton("Convert to Fahrenheit →")
to_c_btn = QPushButton("← Convert to Celsius")

result_label = QLabel("Result will appear here")
result_label.setStyleSheet("font-size: 14px; font-weight: bold;")

# Connect buttons
to_f_btn.clicked.connect(convert_to_f)
to_c_btn.clicked.connect(convert_to_c)

# Layout
layout = QVBoxLayout()
layout.addWidget(QLabel("Temperature Converter"))
layout.addWidget(celsius_input)
layout.addWidget(to_f_btn)
layout.addWidget(fahrenheit_input)
layout.addWidget(to_c_btn)
layout.addWidget(result_label)

window.setLayout(layout)
window.show()
sys.exit(app.exec_())
Qt Best Practices
1. Handle Errors Gracefully
def calculate():
    try:
        num = float(input_field.text())
        # Do calculation
    except ValueError:
        result_label.setText("Invalid input!")
2. Keep UI Code Separate from Logic
# Logic methods (can be tested independently)
def calculate_bmi(weight, height):
    return weight / (height ** 2)

# UI handlers (use the logic methods)
def on_calculate_clicked():
    weight = float(weight_input.text())
    height = float(height_input.text())
    bmi = calculate_bmi(weight, height)
    result_label.setText(f"BMI: {bmi:.2f}")
🎯 TASK 5: Shopping List App
Individually:
Create a shopping list app with:
- QLineEdit for item name
- QLineEdit for item price
- if the price is not a number give user an error that only numbers are accepted.
- QPushButton to add item
- QTextEdit to show all items
- QLabel to show total price
Use methods for:
- Adding items to a list
- Calculating total
- Formatting the display
Starter code:
import sys
from PySide6.QtWidgets import  #Here you need to import the widgets you need

# Global shopping list
shopping_list = []
# Prices for the items in the shopping list
prices = []

def add_item():
    # Get item and price from inputs
    # Add to shopping_list
    # Update display


def calculate_total():
    # Calculate total from shopping_list


def update_display():
    # Show all items in text area
    # Update total label


# Create your UI here...
# Create the application
app = QApplication(sys.argv)
window = QWidget()

# You widgets go here

# Layout
layout = QVBoxLayout()
# Add you widgets here with layout.addWidget(THE WIDGET YOU DEFINED BEFORE)

window.setLayout(layout)
window.show()
sys.exit(app.exec_())
Group Collaboration:
- Compare approaches
- Add features: remove items, clear list, save to file
Part 6: Best Practices and Tips
Method Best Practices
1. Clear Names
# Bad
def calc(x):
    return x * 0.06

# Good
def calculate_tax(price):
    return price * 0.06
2. Single Responsibility
# Bad - does too many things
def process_order_and_print_and_save(order):
    # calculate total
    # print receipt
    # save to file
    # send email
    pass

# Good - one task per method
def calculate_order_total(order):
    # just calculate
    pass

def print_receipt(order, total):
    # just print
    pass
3. Document Your Methods
def calculate_discount(price, discount_percent):
    """
    Calculate the discounted price.

    Parameters:
    price - Original price
    discount_percent - Discount as percentage (0-100)

    Returns:
    Final price after discount
    """
    discount = price * (discount_percent / 100)
    return price - discount
Part 7: Final Project - Restaurant Order System
🎯 FINAL TASK: Complete Restaurant System
Create a restaurant ordering system with both methods and UI.
Requirements:
- Methods to create:
add_to_order(item, price)- Add item to current ordercalculate_subtotal()- Calculate order subtotalcalculate_tax(subtotal)- Calculate 6% taxcalculate_total()- Calculate final totalclear_order()- Clear the current order
- UI elements needed:
- Buttons for at least 5 menu items (with prices)
- QTextEdit to show current order
- QLabel for subtotal
- QLabel for tax
- QLabel for total
- QPushButton to clear order
- Features:
- Clicking a menu item adds it to the order
- Display updates automatically
- Clear button resets everything
Starter template:
import sys
from PySide6.QtWidgets  import # Import what you need here

# Global order list
current_order = []

# Menu (you can modify prices)
menu = {
    "Burger": 8.99,
    "Pizza": 12.99,
    "Salad": 6.50,
    "Fries": 3.50,
    "Drink": 2.99
}

def add_to_order(item, price):
    # Add item to current_order
    pass

def calculate_subtotal():
    # Return sum of all prices in current_order
    pass

def calculate_tax(subtotal):
    # Return tax amount (6%)
    pass

def calculate_total():
    # Return final total (subtotal + tax)
    pass

def update_display():
    # Update all UI elements with current order info
    pass

def clear_order():
    # Clear the order and update display
    pass

# Create menu item button click handlers
def on_burger_clicked():
    add_to_order("Burger", menu["Burger"])
    update_display()

# Create more handlers for other items...

# Build your UI here...
# Create the application
app = QApplication(sys.argv)
window = QWidget()

# You widgets go here

# Layout
layout = QVBoxLayout()
# Add you widgets here with layout.addWidget(THE WIDGET YOU DEFINED BEFORE)

window.setLayout(layout)
window.show()
sys.exit(app.exec_())
Group Collaboration:
- Compare different UI layouts
- Add extra features: quantity selector, remove individual items, receipt printing
Reflection Questions
Answer these in a Markdown cell at the end of your notebook:
- How do methods help reduce code repetition? Give a specific example from this lab.
- What’s the difference between a method that returns a value and one that doesn’t?
- Why is it useful to separate UI code from logic code?
- What was the most challenging part of creating a GUI application?
- How could you use methods and Qt to improve the programs you created in previous labs?
Deliverables
Three files need to be uploaded:
- Individual Colab notebook (.ipynb link) containing:
- Tasks 1-3 (Methods practice)
- Your reflection answers
- Individual Python file (.py) containing:
- Task 4 (Calculator UI)
- Task 5 (Shopping List App)
- Final Task (Restaurant System)
- Group Colab notebook (.ipynb link) containing:
- Consensus solutions for Tasks 1-3
- Group reflection discussion
Important:
- Methods in Colab notebook must run without errors
- Qt applications should be saved as
.pyfiles - Include comments explaining your logic
- Test your Qt apps locally before submitting
📊 Grading Rubric
| Graded Item | Points |
|---|---|
| Individual Colab - Task 1 (Temperature Converter) | 3 pts |
| Individual Colab - Task 2 (Shopping Cart Methods) | 3 pts |
| Individual Colab - Task 3 (Grade System) | 3 pts |
| Individual Python - Task 4 (Calculator UI) | 4 pts |
| Individual Python - Task 5 (Shopping List) | 4 pts |
| Elaborations | 2pts |
| Individual - Final Restaurant System | 3 pts |
| Individual - Reflection Questions | 2 pts |
| Group Colab - Tasks 1-5 Consensus | 6 pts |
| Group - Collaboration & Organization | 6 pts |
Total Points: 36 pts
Extra Credit Opportunities (+3 pts each, max +6):
- Add data persistence (save/load orders to file)
- Implement a login system with different user roles
- Create custom styling with Qt stylesheets
- Add keyboard shortcuts for common actions
Quick Reference
Method Syntax
# Define
def method_name(param1, param2):
    result = param1 + param2
    return result

# Call
answer = method_name(5, 3)
Common Qt Imports
from PySide6.QtWidgets import (
    QApplication, QWidget, QVBoxLayout, QHBoxLayout,
    QPushButton, QLabel, QLineEdit, QTextEdit
)
Qt Widget Methods
widget.setText("text")- Set textwidget.text()- Get textwidget.show()- Make visiblewidget.hide()- Make invisiblebutton.clicked.connect(function)- Connect button to function
Remember: Methods make your code reusable, and Qt makes it beautiful! Practice combining both to create powerful applications.
Drafted by Amirreza Bagherzadehkhorasani and modified by Chris Dancy