LAB 08 - Building more complex UIs in Python with QT
In this lab, you will learn to create UIs using QT Designer for visual development, PySide6 for functionality, Figma for modern design, and QT Bridge to connect everything together!
Why Visual Design Tools?
Imagine building a calculator app:
- Without visual tools → Type hundreds of lines of code just to position buttons
- With visual tools → Drag and drop buttons where you want them!
It’s like the difference between:
- Drawing a house blueprint by typing coordinates (hard!)
- Drawing a house blueprint with a pencil (easy!)
Note: If you are using your personal computer, you need to install QT (Please refer to helper page (link) for more info).
Opeining QT Designer
Windows
- Open Visual Studio Code.
- From the top menu, click on Termminal.
- Select
New Terminal. - In the terminal, run the following command
python -m site --user-site - copy the path by highlighting it using your cursor and then hold command and press
c. - click on the search bar which is located at the buttom toolbar next to start button.
- paste the address by holding control and pressing
v - Press Enter
- locate pyside6 and double click on it.
- locate designer
Mac
- Open Visual Studio Code.
- From the top menu, click on Termminal.
- Select
New Terminal. - In the terminal, run the following command
python -m site --user-site - Hold shift and command button and then press
G - paste the address by holding command and pressing
v - Press Enter
- locate pyside6 and double click on it.
- locate designer
Part 1: QT Designer - Drawing Your Interface
What is QT Designer?
QT Designer is a program that lets you draw your interface instead of coding it. Think of it like:
- Microsoft PowerPoint for creating presentations
- But instead, you’re creating application windows!
You can:
- Drag buttons onto a window
- Move them around with your mouse
- Change their colors and text
- Save your design
- Use it in your Python program
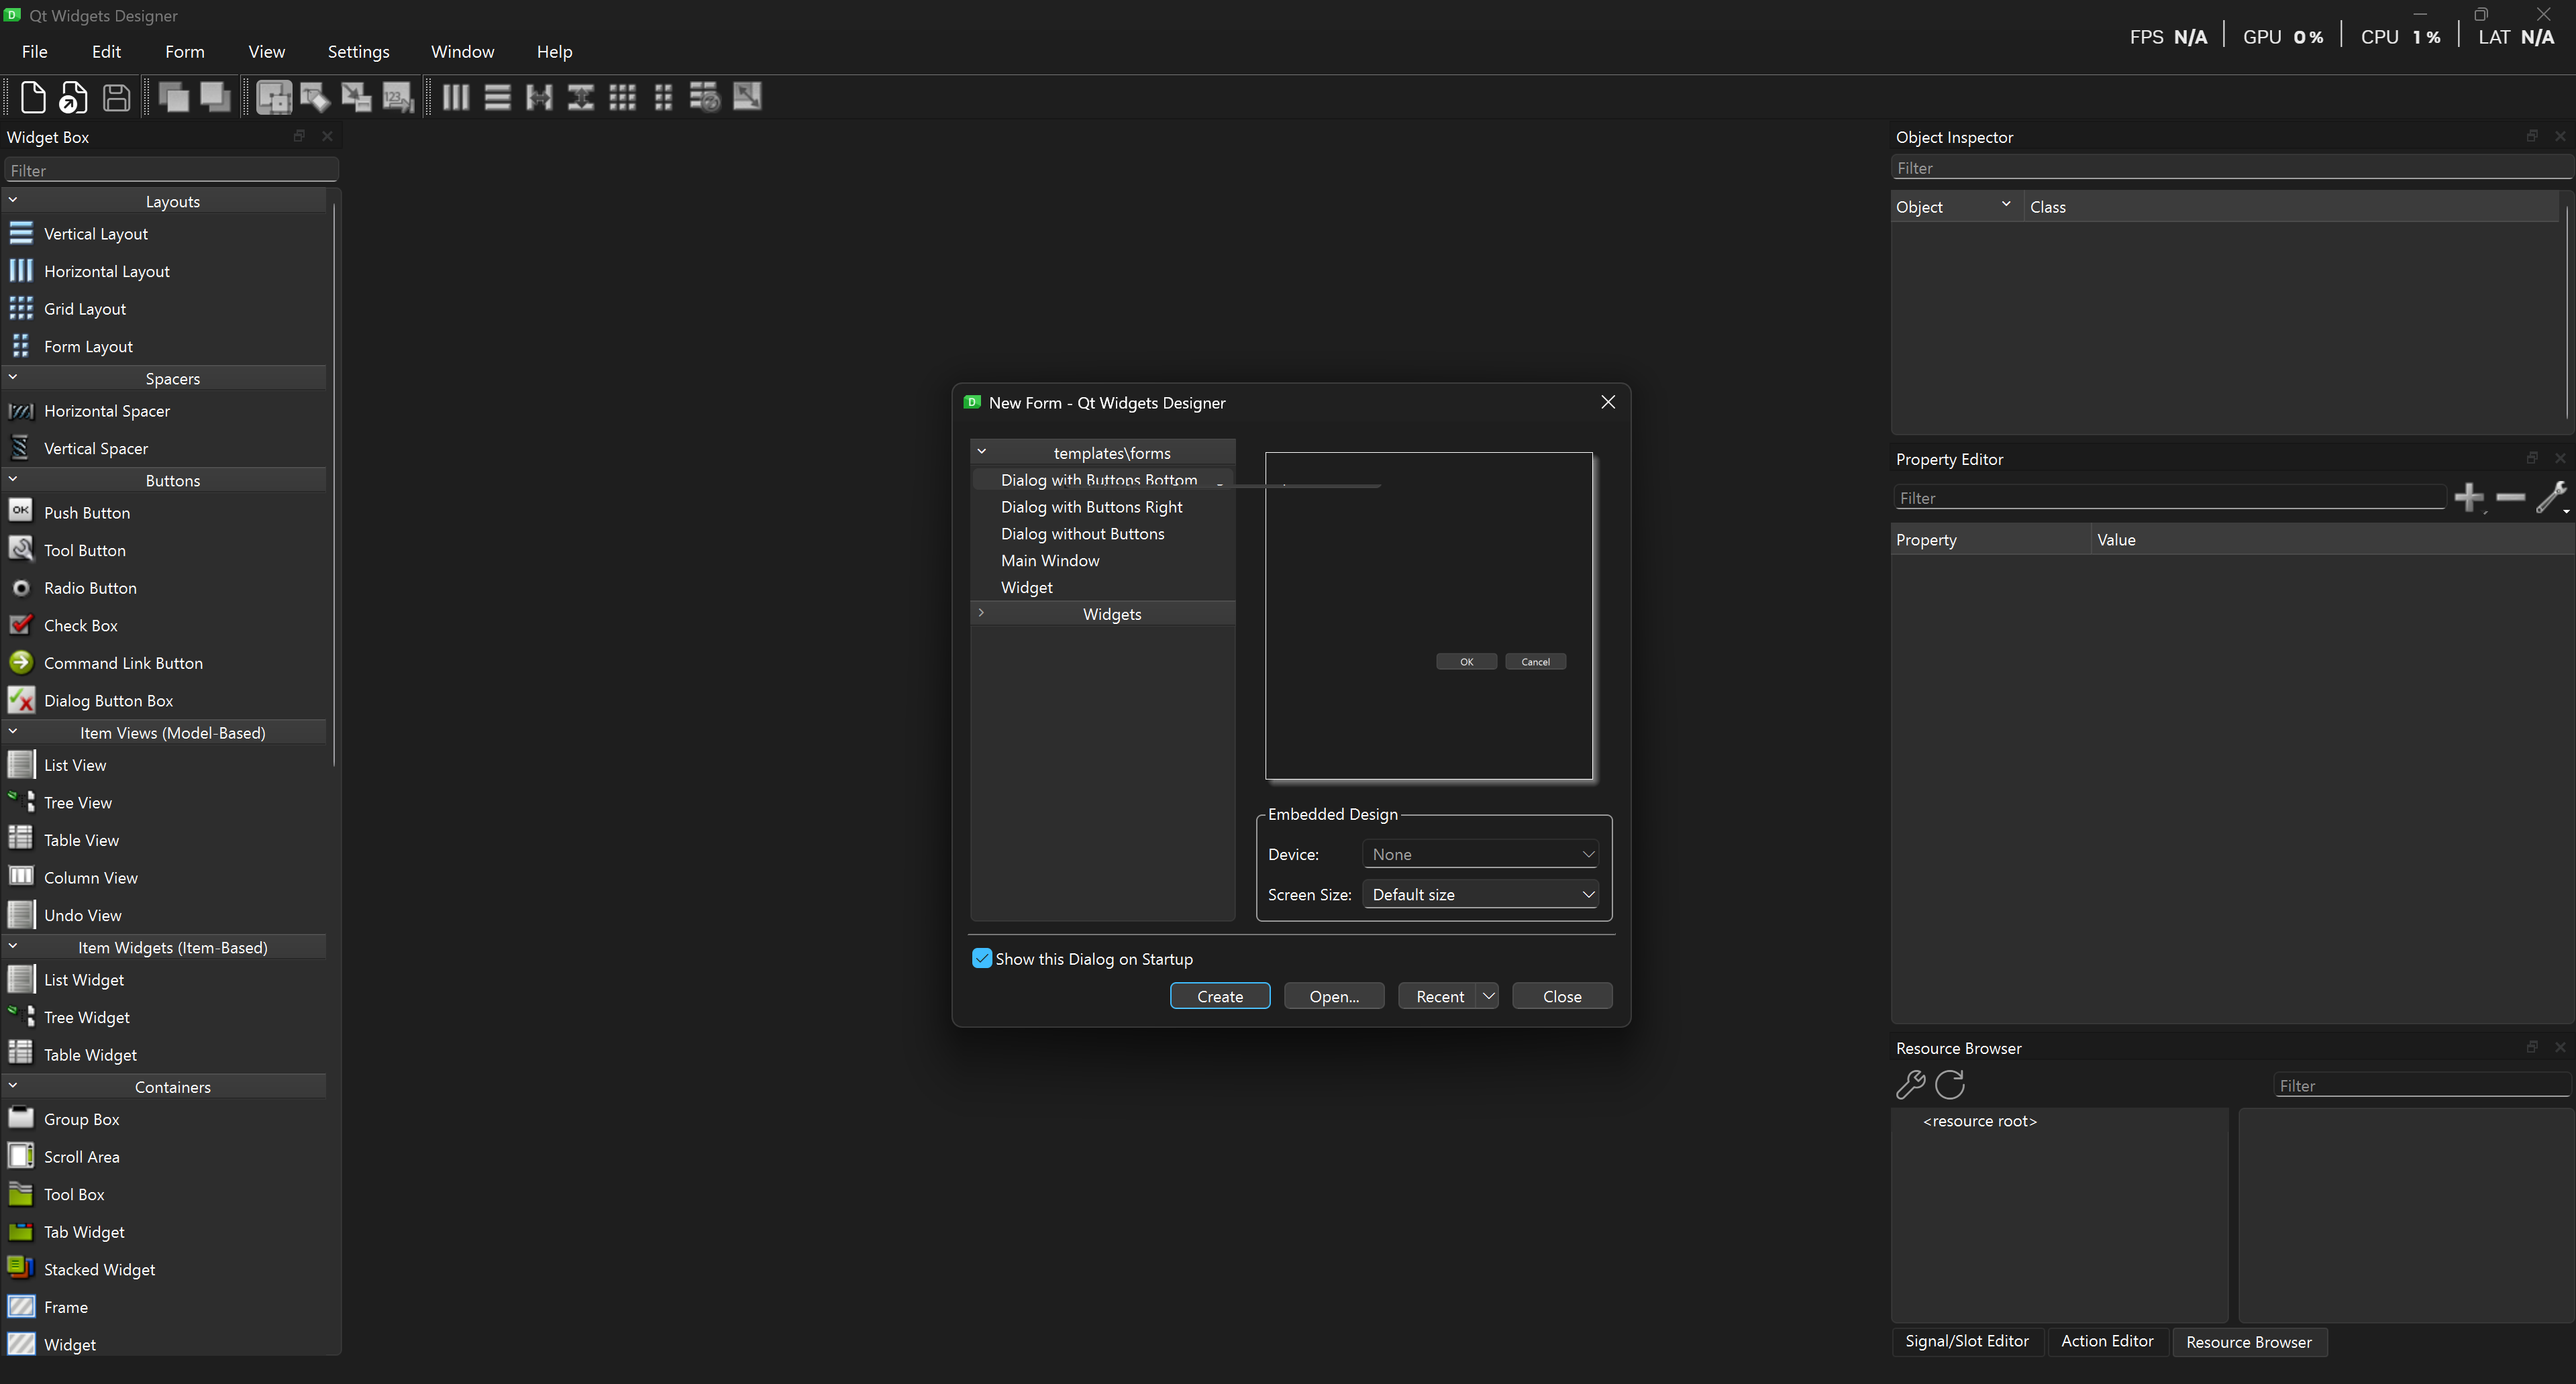
QT Designer Interface - What You’ll See
When QT Designer opens, you’ll see:
- Widget Box (Left Side) - All the things you can add (buttons, text, etc.)
- Your Window (Center) - Where you design
- Property Editor (Right Side) - Change colors, text, sizes
It looks like this:
Creating Your First Window
Step 1: Start a New Design
- Open QT Designer
- A dialog appears asking “What do you want to create?”
- Choose “Main Window”
- Click Create
Step 2: Add a Button
- Look at the Widget Box on the left
- Find “Push Button”
- Drag it onto your window
- Drop it wherever you want
Step 3: Change the Button Text
- Click on your button to select it
- Look at the Property Editor on the right
- Find the property called “text”
- Change it from “PushButton” to “Click Me!”
Step 4: Add a Label
- From Widget Box, drag a “Label”
- Drop it above your button
- In Property Editor, change text to “Hello World!”
Step 5: Save Your Design
- File → Save
- Name it
my_first_design.ui - Remember where you saved it!
Beaware: objectName
In the property Editor, the first property is called objectName. This is identical to the Python variable names you choose. Keep this in mind, later when you import your design to Python, you will need to remember the objectNames of your widgets!
Making Things Look Nice with Layouts
Layouts help organize your widgets automatically. Instead of manually placing everything, layouts arrange them for you.
Types of Layouts:
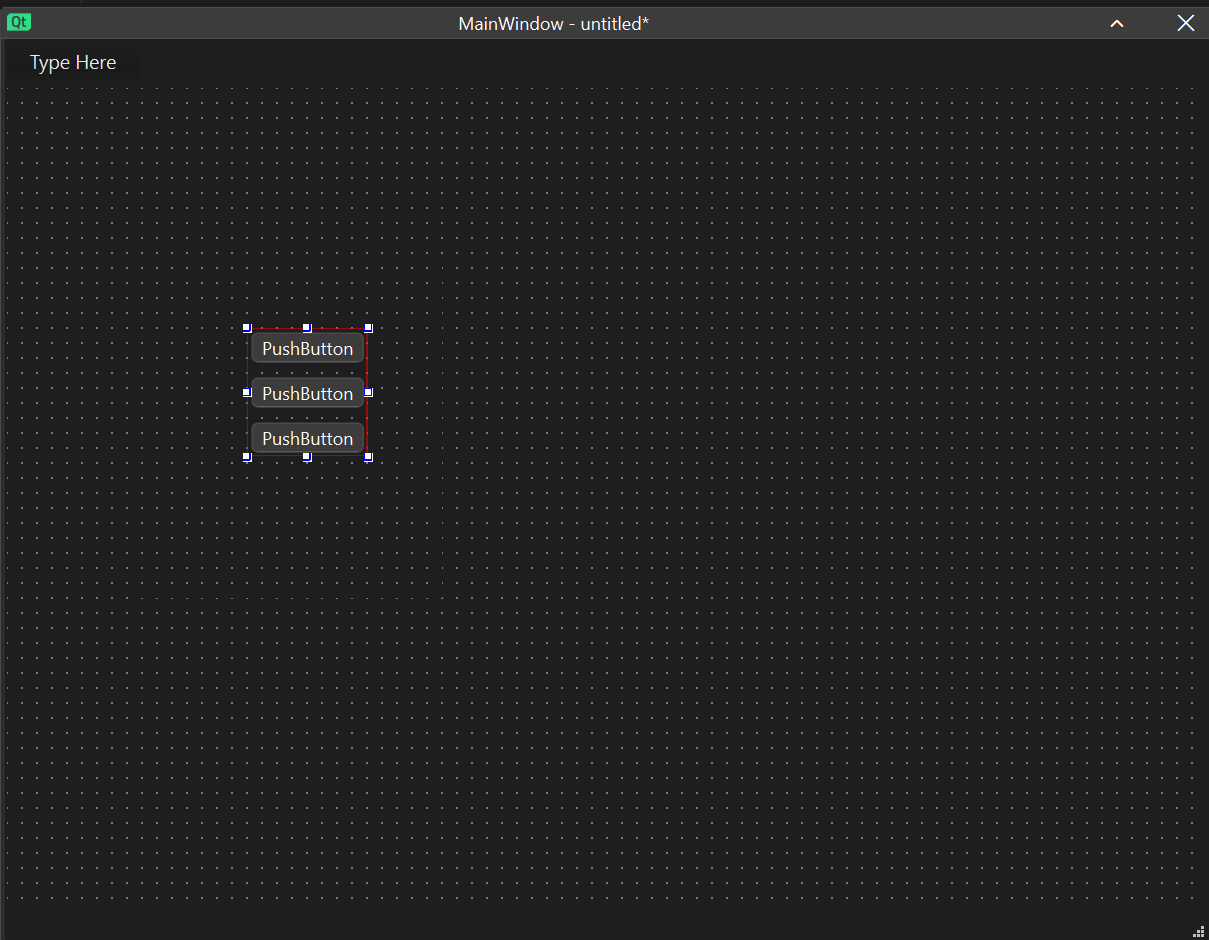
Vertical Layout - Stacks things top to bottom:
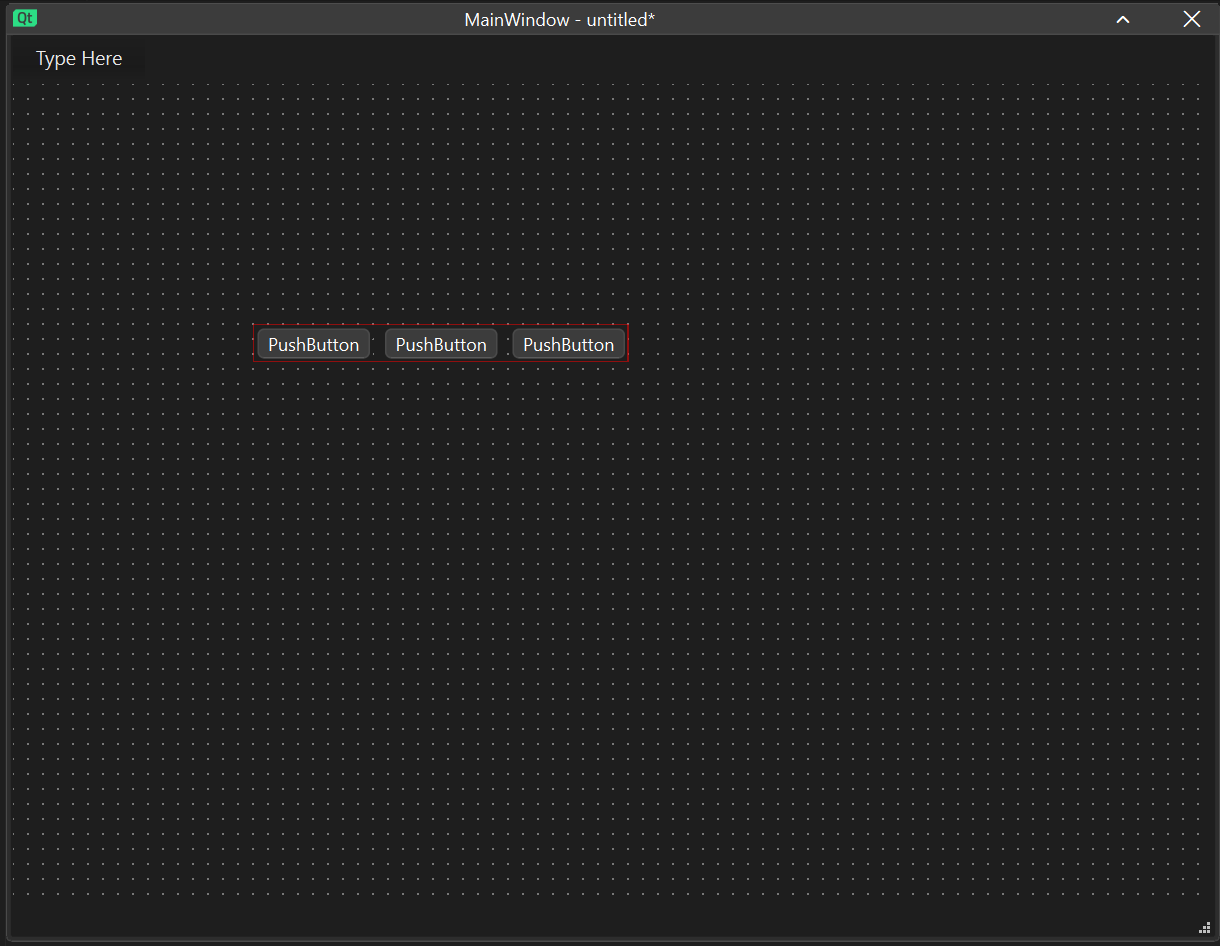
Horizontal Layout - Places things side by side:
How to Use Layouts:
- Select multiple widgets (hold Ctrl and click each one)
- Right-click on one of them
- Choose “Lay out” → “Lay Out Vertically” (or Horizontally)
🎯 TASK 1: Create a Form
Individually:
Using QT Designer, create a window with:
- A label that says “Student Information”
- Another label that says “Name:”
- A Line Edit (text box) for entering name
- A label that says “Age:”
- A Spin Box for entering age
- A Push Button that says “Submit”
- Another Push Button that says “Clear”
Arrange them nicely using layouts!
Save your file as student_form.ui
Group Collaboration:
- Show each other your designs
- Discuss: what are the differences in the designs? Why did you choose that design, etc.
- Based on the consensus, design a final UI for the form.
Part 2: Using Your Design in Python (PySide6)
Loading Your Design File
Now let’s use the design you created in Python!
Load the .ui File Directly (Easiest!)
import sys
from PySide6.QtWidgets import QApplication
from PySide6.QtUiTools import QUiLoader
from PySide6.QtCore import QFile

# Create the application
app = QApplication(sys.argv)

# Load your design file
loader = QUiLoader()
ui_file = QFile("student_form.ui")
ui_file.open(QFile.ReadOnly)
window = loader.load(ui_file)
ui_file.close()

# Show the window
window.show()

# Run the application
sys.exit(app.exec())
Important Note
You need to make sure the location of the python file, ui file and the directory, set in the Visual Studio Code are all identical. First step is to copy both python file nad the ui file into the same folder. Then in the VS code, click on Explorer either by holding control, shift and E, or selecting the following option in the User Interface:
Click on Open Folder and navigate to the same folder.
Reminder: Adding Functionality to Buttons
Let’s make buttons actually do something when clicked!
Reminder: Simple Example: Button Click
import sys
from PySide6.QtWidgets import QApplication, QWidget, QPushButton, QLabel, QVBoxLayout

# Create application
app = QApplication(sys.argv)

# Create window
window = QWidget()
window.setWindowTitle("My Clicky App")

# Create widgets
label = QLabel("No button clicked yet")
button = QPushButton("Click Me!")

# Create a function for button click
def button_was_clicked():
    label.setText("Button was clicked!")
    print("Someone clicked the button!")

# Connect button to function
button.clicked.connect(button_was_clicked)

# Create layout and add widgets
layout = QVBoxLayout()
layout.addWidget(label)
layout.addWidget(button)
window.setLayout(layout)

# Show window
window.show()

# Run application
sys.exit(app.exec())
Reminder: Working with Text Input
Getting text from input boxes and doing something with it:
import sys
from PySide6.QtWidgets import QApplication, QWidget, QPushButton, QLabel, QLineEdit, QVBoxLayout

app = QApplication(sys.argv)
window = QWidget()
window.setWindowTitle("Greeting App")

# Create widgets
name_input = QLineEdit()
name_input.setPlaceholderText("Enter your name")
greet_button = QPushButton("Greet Me!")
result_label = QLabel("")

# Function to handle greeting
def greet_user():
    name = name_input.text()  # Get the text from input
    if name:
        result_label.setText("Hello, " + name + "!")
        print("Greeting:", name)
    else:
        result_label.setText("Please enter a name!")

# Connect button to function
greet_button.clicked.connect(greet_user)

# Layout
layout = QVBoxLayout()
layout.addWidget(QLabel("What's your name?"))
layout.addWidget(name_input)
layout.addWidget(greet_button)
layout.addWidget(result_label)
window.setLayout(layout)

window.show()
sys.exit(app.exec())
Using Your QT Designer File with Functions
Here’s how to load your .ui file and add functionality. Don’t forget to check the ObjectNames you chose in QTDesigner. You will need to refer to them here:
import sys
from PySide6.QtWidgets import QApplication
from PySide6.QtUiTools import QUiLoader
from PySide6.QtCore import QFile

def submit_clicked():
    # Get text from the name input
    name = window.nameLineEdit.text()
    age = window.ageSpinBox.value()
    print("Name:", name)
    print("Age:", age)
    # Update a label to show feedback
    window.statusLabel.setText("Form submitted!")

def clear_clicked():
    # Clear all inputs
    window.nameLineEdit.clear()
    window.ageSpinBox.setValue(0)
    window.statusLabel.setText("Form cleared!")
    print("Form was cleared")

# Create application
app = QApplication(sys.argv)

# Load the UI file
loader = QUiLoader()
ui_file = QFile("student_form.ui")
ui_file.open(QFile.ReadOnly)
# Load the UI
window = loader.load(ui_file)
ui_file.close()

# Connect buttons to functions
window.submitButton.clicked.connect(submit_clicked)
window.clearButton.clicked.connect(clear_clicked)

# Show window
window.show()

# Run application
sys.exit(app.exec())
Common Widget Operations
Here’s what you can do with different widgets:
# QLineEdit (Text Input)
text_input.text()           # Get the text
text_input.setText("Hello") # Set the text
text_input.clear()          # Clear it

# QLabel (Display Text)
label.setText("New text")   # Change the text

# QPushButton (Button)
button.clicked.connect(function_name)  # Run function when clicked
button.setText("New Label")            # Change button text

# QSpinBox (Number Input)
spin_box.value()            # Get the number
spin_box.setValue(10)       # Set the number

# QTextEdit (Multi-line Text)
text_edit.toPlainText()     # Get all text
text_edit.setPlainText("Text") # Set text
text_edit.clear()           # Clear it
🎯 TASK 2: Make Your Form Interactive
Individually:
Using your student_form.ui from Task 1:
- Create a Python file that loads your UI
- Add these functions:
submit_form()- prints the name and age to consoleclear_form()- clears all inputs
- Connect the buttons to your functions
- Add validation:
- If name is empty, print “Please enter a name”
- If age is 0, print “Please enter an age”
- Save the data in a DataFrame.
Example structure:
import sys
from PySide6.QtWidgets import QApplication
from PySide6.QtUiTools import QUiLoader
from PySide6.QtCore import QFile
import pandas as pd

def submit_form():
    # Get the name from nameLineEdit
    # Get the age from ageSpinBox
    # Check if valid
    # Print the information
    pass  # Replace with your code

def clear_form():
    # Clear nameLineEdit
    # Set ageSpinBox to 0
    pass  # Replace with your code

# Load UI and connect buttons
# Create application
app = QApplication(sys.argv)

# Load the UI file
loader = QUiLoader()
ui_file = QFile("student_form.ui")
ui_file.open(QFile.ReadOnly)
# Load the UI
window = loader.load(ui_file)
ui_file.close()

# Your code here...
Group Collaboration:
- Test each other’s forms
- Try to break them (empty inputs, etc.)
- Discuss: How can we make forms more user-friendly?
Part 3: Designing Interfaces in Figma
What is Figma?
Figma is a free design tool that professionals use to design apps and websites. Think of it like:
- Drawing your app on paper first
- But digital and much more powerful!
You can:
- Draw buttons, text, and boxes
- Choose colors and fonts
- See how your app will look
- Share designs with others
Getting Started with Figma
Step 1: Login to Figma
- Go to figma.com
- Login
- Click “New design file” under your group project
Step 2: Create a Frame (Your Window)
- Press F key (or click Frame tool)
- On the right, choose Desktop → Desktop (1440 × 1024)
- This is your app window!
Step 3: Basic Tools
- Rectangle (R) - Draw boxes and buttons
- Text (T) - Add text labels
- Move (V) - Select and move things
- Hand (H) - Pan around your design
Creating a Simple Login Screen
Let’s design a login screen step by step:
Step 1: Background
- Select your frame
- On right panel, find “Fill”
- Click the color box
- Choose a light gray (#F5F5F5)
Step 2: Login Box
- Press R (Rectangle tool)
- Draw a rectangle in the center
- Make it white (#FFFFFF)
- Round the corners:
- Find “Corner radius” on right
- Set to 8
Step 3: Title Text
- Press T (Text tool)
- Click inside the white box
- Type “Login”
- On right panel (Typogarphy):
- Size: 24
- Weight: Bold
- Color: Dark gray (#333333)
Step 4: Input Fields
For username field:
- Press R to draw a rectangle
- Make it:
- Width: 300
- Height: 150
- Fill: White
- Stroke: Light gray (#DDDDDD)
- Corner radius: 4
- Press T and add placeholder text “Username”
- Make text gray (#999999)
Repeat for password field below it!
Step 5: Login Button
- Press R to draw button shape
- Make it:
- Width: 300
- Height: 40
- Fill: Blue (#007BFF)
- Corner radius: 4
- Press T and add “Login” text
- Make text white and centered
Design Tips for Beginners
Colors
Start with simple colors:
- Background: Light gray (#F5F5F5)
- Cards/Boxes: White (#FFFFFF)
- Primary Button: Blue (#007BFF)
- Text: Dark gray (#333333)
- Borders: Light gray (#DDDDDD)
Spacing
Use consistent spacing:
- Between elements: 16px
- Inside boxes (padding): 20px
- Between sections: 32px
Fonts
Keep it simple:
- Titles: Size 24, Bold
- Regular text: Size 14, Regular
- Button text: Size 14, Medium
Alignment
- Center important elements
- Align text to the left
- Keep consistent margins
🎯 TASK 3: Design a Contact Form
Individually:
In Figma, design a simple contact form with:
- Frame (1440 × 1024 desktop size)
- White card in center (width: 500px)
- Title “Contact Us” at top
- Four input fields:
- Name
- Phone
- Message (make this one taller - 100px)
- Two buttons at bottom:
- Submit (blue)
- Cancel (gray)
Design requirements:
- Use consistent spacing (16px between elements)
- All input fields same width (400px)
- Buttons side by side
- Add placeholder text to each field
Export your design:
- Select your frame
- On right panel, scroll to “Export”
- Choose PNG
- Click “Export”
- Save as
contact_form_design.png
Group Collaboration:
- Share your designs
- Discuss: What makes a form look professional?
- Vote on the best design
Part 4: QT Bridge - From Figma Design to QT
What is QT Bridge?
QT Bridge is a tool that helps you:
- Take your Figma design
- Automatically convert it to QT code
- Save you from manually recreating everything
Think of it like:
- You draw a picture (Figma)
- QT Bridge traces it for you (converts to code)
- You can use it in your Python program!
Installing QT Bridge Plugin in Figma
Step 1: Open Your Figma Design
- Open your contact form design from Task 3
- Click on “Plugins” in the menu
- Search for “Qt Bridge for Figma”
- Click “Run”
Step 2: Export Your Design
When the plugin opens:
- Select your frame
- Click “Export”
- Choose these settings:
- Format: QML
- Include assets: Yes
- Click “Export” button
- Save the file (it will be
.qtbridgeformat)
What is QML?
QML is another way to describe interfaces. It’s like HTML for QT:
- Easier to read than Python
- Describes how things look
- Can be used with Python
Example QML:
Rectangle {
    width: 200
    height: 100
    color: "blue"

    Text {
        text: "Hello World"
        color: "white"
    }
}
Part 5: Qt Design Studio - From .qtbridge to QML
What is Qt Design Studio?
Qt Design Studio is a professional tool for creating QML (Qt Modeling Language) interfaces. It’s different from Qt Designer:
Qt Designer:
- Creates
.uifiles for traditional Qt widgets - Good for standard desktop applications
- XML-based format
Qt Design Studio:
- Creates
.qmlfiles for modern, fluid interfaces - Better for mobile and modern apps
- JavaScript-based format
- More powerful animations and effects
Think of QML as the “modern” way to build Qt interfaces!
Installing Qt Design Studio
Windows:
- Download from: https://www.qt.io/download
- Choose “Qt Design Studio”
- Install (free version available)
- Launch Qt Design Studio
Verify Installation:
- Open Qt Design Studio
- You should see a welcome screen
- Look for “Open Project” option
Opening .qtbridge Files in Qt Design Studio
Step 1: Launch Qt Design Studio
- Open Qt Design Studio
- On the welcome screen, click “Open Project”
Step 2: Import Your .qtbridge File
- Navigate to where you saved your
.qtbridgefile - Select your file (e.g.,
contact_form.qtbridge) - Click Open
- Qt Design Studio will convert and open your Figma design!
What You’ll See:
[Navigator (Left)]     [Design View (Center)]     [Properties (Right)]
   - Component Tree    - Your imported design      - Element properties
   - Visual hierarchy  - Editable view            - Styling options
Step 3: Review Your Design
Your Figma design is now in Qt Design Studio!
- All your layers are imported
- Colors and spacing are preserved
- Text and buttons are there
- Ready to refine and export
Understanding the Qt Design Studio Interface
Navigator Panel (Left):
Shows your design structure:
contactForm
├── titleText
├── nameInput
├── emailInput
├── messageInput
└── submitButton
Design View (Center):
- Your visual design
- Click to select elements
- Drag to reposition
- Edit directly
Properties Panel (Right):
- Change colors
- Adjust sizes
- Modify text
- Add animations
Refining Your Design in Qt Design Studio
Making Elements Interactive:
1. Add Object Names:
Select element → Properties → id: "submitBtn"
These IDs will be used in Python code later!
2. Set Properties:
submitBtn
├── text: "Submit"
├── width: 200
├── height: 50
└── enabled: true
3. Check Layouts: Make sure elements are properly positioned:
- Use anchors for relative positioning
- Set proper margins
- Ensure responsive behavior
Exporting to QML Format
Now let’s export your design as QML files that Python can use!
Step 1: Prepare for Export
- Make sure all elements have proper IDs
- Check that your design looks correct
- Save your project in Qt Design Studio
Step 2: Export as QML
Method 1: Direct Export
- In Qt Design Studio, go to File → Export
- Choose QML Files
- Select your output folder
- Click Export
Method 2: Copy Project Files Qt Design Studio saves QML files automatically:
- Find your project folder
- Look for
.qmlfiles - Your main file might be named like
contactForm.qml - Copy the QML files to your Python project folder
Understanding QML File Structure:
A typical exported QML file looks like this:
import QtQuick 2.15
import QtQuick.Controls 2.15

Rectangle {
    id: contactForm
    width: 600
    height: 800
    color: "#f8f9fa"

    Text {
        id: titleText
        text: "Contact Us"
        font.pixelSize: 24
        x: 50
        y: 30
    }

    TextField {
        id: nameInput
        placeholderText: "Enter your name"
        x: 50
        y: 100
        width: 500
        height: 40
    }

    Button {
        id: submitBtn
        text: "Submit"
        x: 50
        y: 400
        width: 200
        height: 50
    }
}
🎯 TASK 4: Complete the Qt Design Studio Workflow
Individually:
- Open your .qtbridge file in Qt Design Studio
- Review and refine your design:
- Add proper IDs to all interactive elements
- Change the IDs so that all of the elements’ names start with task4_ for example, the sign in button’s ID should be
"task4_Signin" - Verify colors and spacing
- Adjust any layout issues
- Export as QML:
- Export your design
- Save as
contact_form.qml - Keep it in your project folder
Group Collaboration:
- Compare exported QML files
- Discuss any differences from original Figma design
- Share tips about Qt Design Studio features
Part 6: Using QML Files in Python
What is QML and Why Use It?
QML (Qt Modeling Language) is a declarative language for designing user interfaces. It’s different from traditional Qt widgets:
Traditional Qt (Widgets):
button = QPushButton("Click Me")
button.setGeometry(50, 50, 200, 40)
Modern Qt (QML):
Button {
    text: "Click Me"
    x: 50; y: 50
    width: 200; height: 40
}
Benefits of QML:
- Cleaner, more readable code
- Better animations and effects
- Easier to create modern, fluid interfaces
- Separates design from logic
- Great for mobile and desktop apps
Setting Up QML with Python (PySide6)
Required Imports:
import sys
from PySide6.QtCore import QUrl
from PySide6.QtWidgets import QApplication
from PySide6.QtQml import QQmlApplicationEngine
These imports provide:
QQmlApplicationEngine- Loads and runs QML filesQUrl- Handles file paths correctlyQApplication- Creates the application
Loading QML Files in Python
Basic QML Loading Example:
import sys
from pathlib import Path
from PySide6.QtCore import QUrl
from PySide6.QtWidgets import QApplication
from PySide6.QtQml import QQmlApplicationEngine

# Create the application
app = QApplication(sys.argv)

# Create the QML engine
engine = QQmlApplicationEngine()

# Load the QML file
qml_file =  "contact_form.qml"
engine.load(QUrl.fromLocalFile(str(qml_file)))

# Check if loading succeeded
if not engine.rootObjects():
    sys.exit(-1)

# Run the application
sys.exit(app.exec())
Understanding the Code:
1. Create QML Engine:
engine = QQmlApplicationEngine()
This engine loads and manages QML files.
2. Find QML File Path:
qml_file = "contact_form.qml"
3. Load QML:
engine.load(QUrl.fromLocalFile(str(qml_file)))
Loads the QML file into the engine.
4. Error Check:
if not engine.rootObjects():
    sys.exit(-1)
Ensures the QML file loaded successfully.
Accessing QML Elements from Python
To interact with QML elements from Python, you need to:
- Get the root QML object
- Find child elements by their IDs
- Connect to signals or modify properties
Example: Getting QML Objects:
import sys
from pathlib import Path
from PySide6.QtCore import QUrl, QObject, Slot
from PySide6.QtWidgets import QApplication
from PySide6.QtQml import QQmlApplicationEngine

# Create application
app = QApplication(sys.argv)
engine = QQmlApplicationEngine()

# Load QML
qml_file =  "contact_form.qml"
engine.load(QUrl.fromLocalFile(str(qml_file)))

# Get root object
if engine.rootObjects():
    root = engine.rootObjects()[0]

    # Access QML elements by ID
    submit_btn = root.findChild(QObject, "submitBtn") # Here you need to insert the name you chose in Design Studio for the button
    name_input = root.findChild(QObject, "nameInput")

    print("QML objects loaded successfully!")
else:
    sys.exit(-1)

sys.exit(app.exec())
Connecting QML Signals to Python Functions
QML elements emit signals (like button clicks). You can connect these to Python functions:
Method 1: Using QML signal connections
Step 1: Modify QML to emit signals:
Button {
    id: submitBtn
    text: "Submit"
    signal buttonClicked()

    onClicked: {
        buttonClicked()  // Emit custom signal
    }
}
Step 2: Connect in Python:
# In your Python code
submit_btn = root.findChild(QObject, "submitBtn")

def handle_submit():
    print("Submit button was clicked!")
    name_input = root.findChild(QObject, "nameInput")
    name_text = name_input.property("text")
    print("Name entered:", name_text)

# Connect the signal
submit_btn.buttonClicked.connect(handle_submit)
🎯 TASK 5: Improve Your Contact Form
Individually:
Take your contact form and add these improvements:
- Input Validation:
def validate_email(): email = email_input.text() if "@" not in email: email_status.setText("Invalid email") return False email_status.setText("✓") return True - User Feedback:
- Show “✓” when field is valid
- Show “✗” when field is invalid
- Disable Submit Until Valid:
def check_form(): # Check if all fields have content if name_input.text() and email_input.text(): submit_button.setEnabled(True) else: submit_button.setEnabled(False) - Success Message:
- Show “Thank you!” message after submit
- Save the data in a DataFrame.
Group Collaboration:
- Test each other’s validation
- Try to break the forms
- List the issues and create a form with all the problems fixed.
Reflection Questions
Answer these in your notebook:
- How does using QT Designer save time compared to writing all the UI code manually?
- What was the most challenging part of connecting your design to Python code?
- How did Figma help you plan your interface before coding?
- What’s one thing you learned about making user-friendly interfaces?
- If you were to build a larger application, how would these tools help you?
Deliverables
Submit these files:
- Reflection and explanations (.docs file) containing:
- Your reflection answers
- Design Files:
- Figma design link or screenshots
- All
.uifiles from QT Designer and a screenshot of the ui design - .png file for tasks that require the png export
- Python Files:
- All tasks that require a python file should be submitted as task_{x}.py where x is the task number.
- Group Files:
- Shared design guidelines document
- Group testing results
📊 Grading Rubric
| Graded Item | Points | |————-|——–| | Individual - Task 1 | 3 pts | | Individual - Task 2 | 3 pts | | Individual - Task 3 | 3 pts | | Individual - Task 4 | 4 pts | | Individual - Task 5 | 4 pts | | Reflections| 2pts| | Group - Task 1 | 3 pts | | Group - Task 2 | 3 pts | | Group - Task 3 | 3 pts | | Group - Task 4 | 4 pts | | Group - Task 5 | 4 pts | Total Points: 36 pts
Quick Reference
Common Imports
from PySide6.QtWidgets import (
    QApplication, QWidget, QMainWindow,
    QPushButton, QLabel, QLineEdit, QTextEdit,
    QVBoxLayout, QHBoxLayout, QGridLayout,
    QListWidget, QComboBox, QSpinBox, QCheckBox
)
Accessing QML Objects & Signals (when using QML)
from PySide6.QtCore import QObject

root = engine.rootObjects()[0]
submit_btn = root.findChild(QObject, "submitBtn")
name_input = root.findChild(QObject, "nameInput")

def handle_submit():
    print("Submit clicked")
    print("Name:", name_input.property("text"))  # read QML property

submit_btn.buttonClicked.connect(handle_submit)  # custom signal defined in QML
# QML side:
# Button { id: submitBtn; signal buttonClicked(); onClicked: buttonClicked() }
Loading a .ui (Designer)
from PySide6.QtUiTools import QUiLoader
from PySide6.QtCore import QFile

loader = QUiLoader()
f = QFile("student_form.ui")
f.open(QFile.ReadOnly)
window = loader.load(f)
f.close()
Widget Methods
# QLineEdit
input.text()              # Get text
input.setText("text")     # Set text
input.clear()             # Clear
input.setPlaceholderText("hint")  # Gray hint text

# QPushButton
button.clicked.connect(function)  # Connect to function
button.setText("Label")           # Change text
button.setEnabled(False)          # Disable

# QLabel
label.setText("text")     # Change text

# QListWidget
list.addItem("item")      # Add item
list.clear()              # Clear all
list.currentRow()         # Get selected index

#QSpinBox
spin.value()
spin.setValue(18)
spin.setRange(0, 120)
spin.valueChanged.connect(func)

#QComboBox
combo.addItems(["A", "B", "C"])
combo.currentText()
combo.currentIndex()
combo.setCurrentIndex(0)
combo.currentTextChanged.connect(func)
# QCheckBox
check.isChecked()
check.setChecked(True)
check.toggled.connect(func)

#QCheckBox
check.isChecked()
check.setChecked(True)
check.toggled.connect(func)
Remember: Start simple, test often, and gradually add features. The best apps are those that users find easy and enjoyable to use!
Drafted by Amirreza Bagherzadehkhorasani and modified by Chris Dancy